 by
In the previous post, we implemented the secure end-to-end telemetry path from the STM32U5 to AWS IoT Core. The Rust firmware collected the onboard sensor readings, encoded them as JSON, connected to AWS IoT Core through the EMW3080 Wi-Fi module, completed the mutual TLS and MQTT handshakes, and published each message at QoS 1. The matching PUBACK confirmed that AWS IoT Core had accepted the publication, and the telemetry was also received through the AWS MQTT test client.
That implementation proved that the complete data path worked, but it established a new TCP, TLS and MQTT connection for every telemetry message.
Resolve AWS endpoint → Open TCP socket → Complete TLS handshake → Send MQTT CONNECT → Receive CONNACK → Publish one message → Receive PUBACK → Close the connection
The next implementation should perform the connection sequence once and then reuse the established TLS and MQTT session:
Resolve AWS endpoint → Open TCP socket → Complete TLS handshake → Send MQTT CONNECT → Receive CONNACK → Keep the session open → Publish telemetry → Receive PUBACK → Publish the next telemetry message → Receive PUBACK → Send PINGREQ when idle → Receive PINGRESP
Both layers must remain open. Retaining the TLS connection while repeatedly sending MQTT CONNECT packets would be incorrect. One TCP connection should carry one TLS session, and that TLS session should carry one established MQTT session.
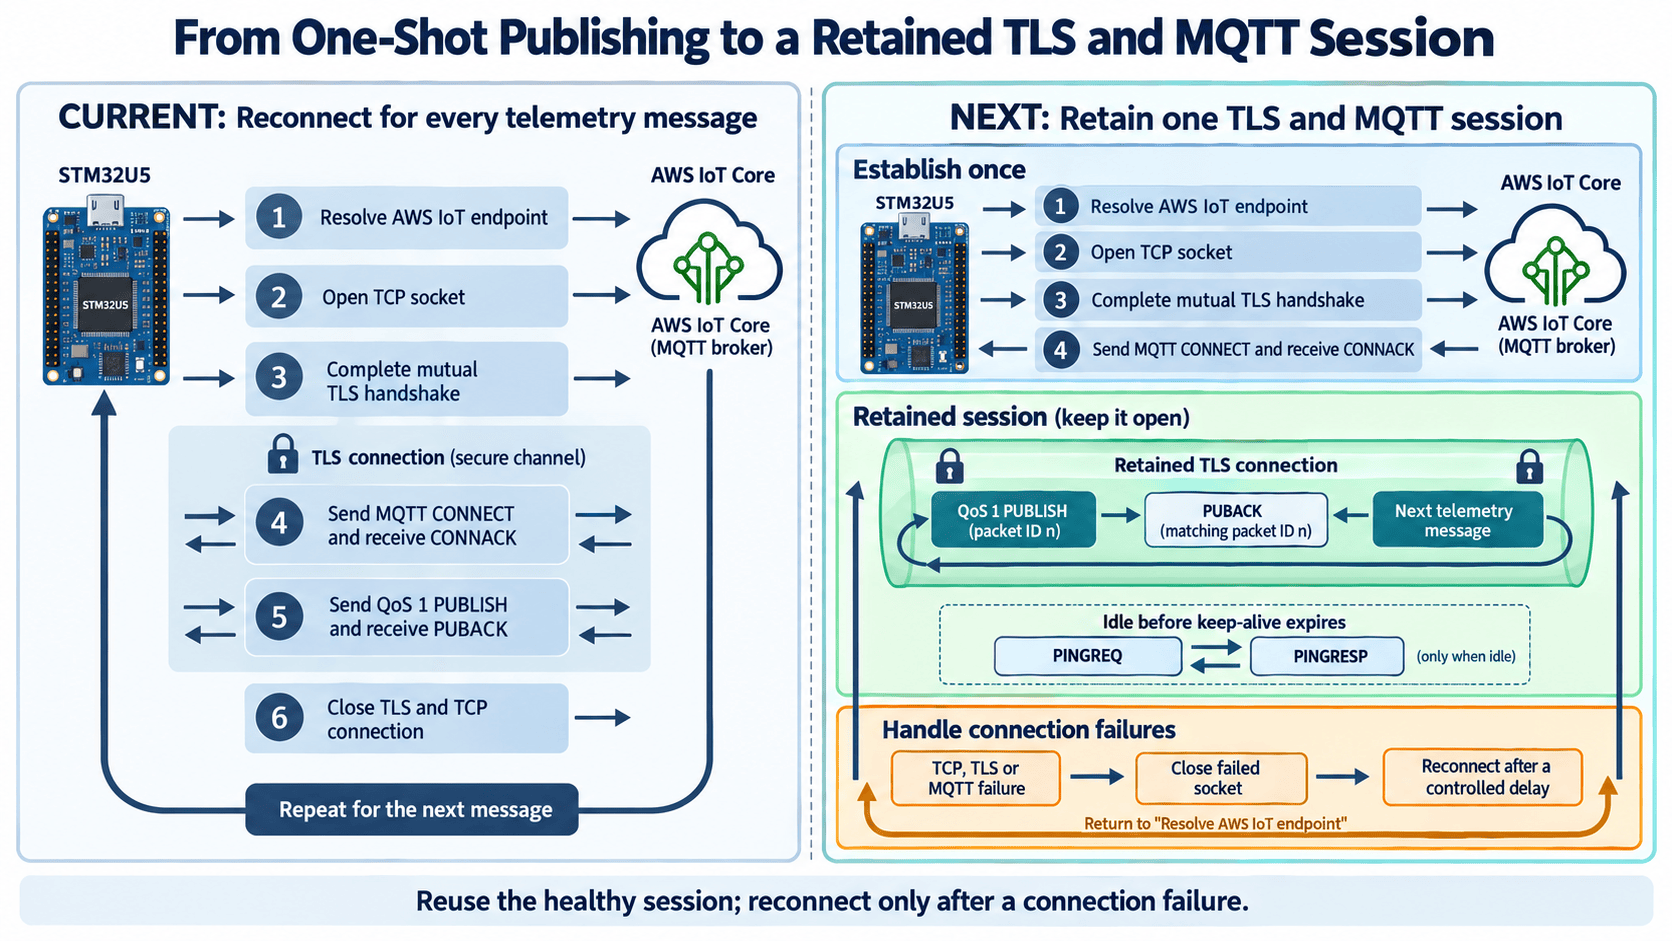
The connection now has two operating phases
The revised firmware separates connection establishment from telemetry publishing. During the establishment phase, the firmware:
- Resolves the AWS IoT endpoint.
- Opens a TCP socket through the EMW3080 module.
- Wraps that socket in the project’s asynchronous TCP transport adapter.
- Completes the mutual TLS handshake.
- Sends one MQTT
CONNECTpacket through the encrypted connection. - Validates the broker’s
CONNACKresponse.
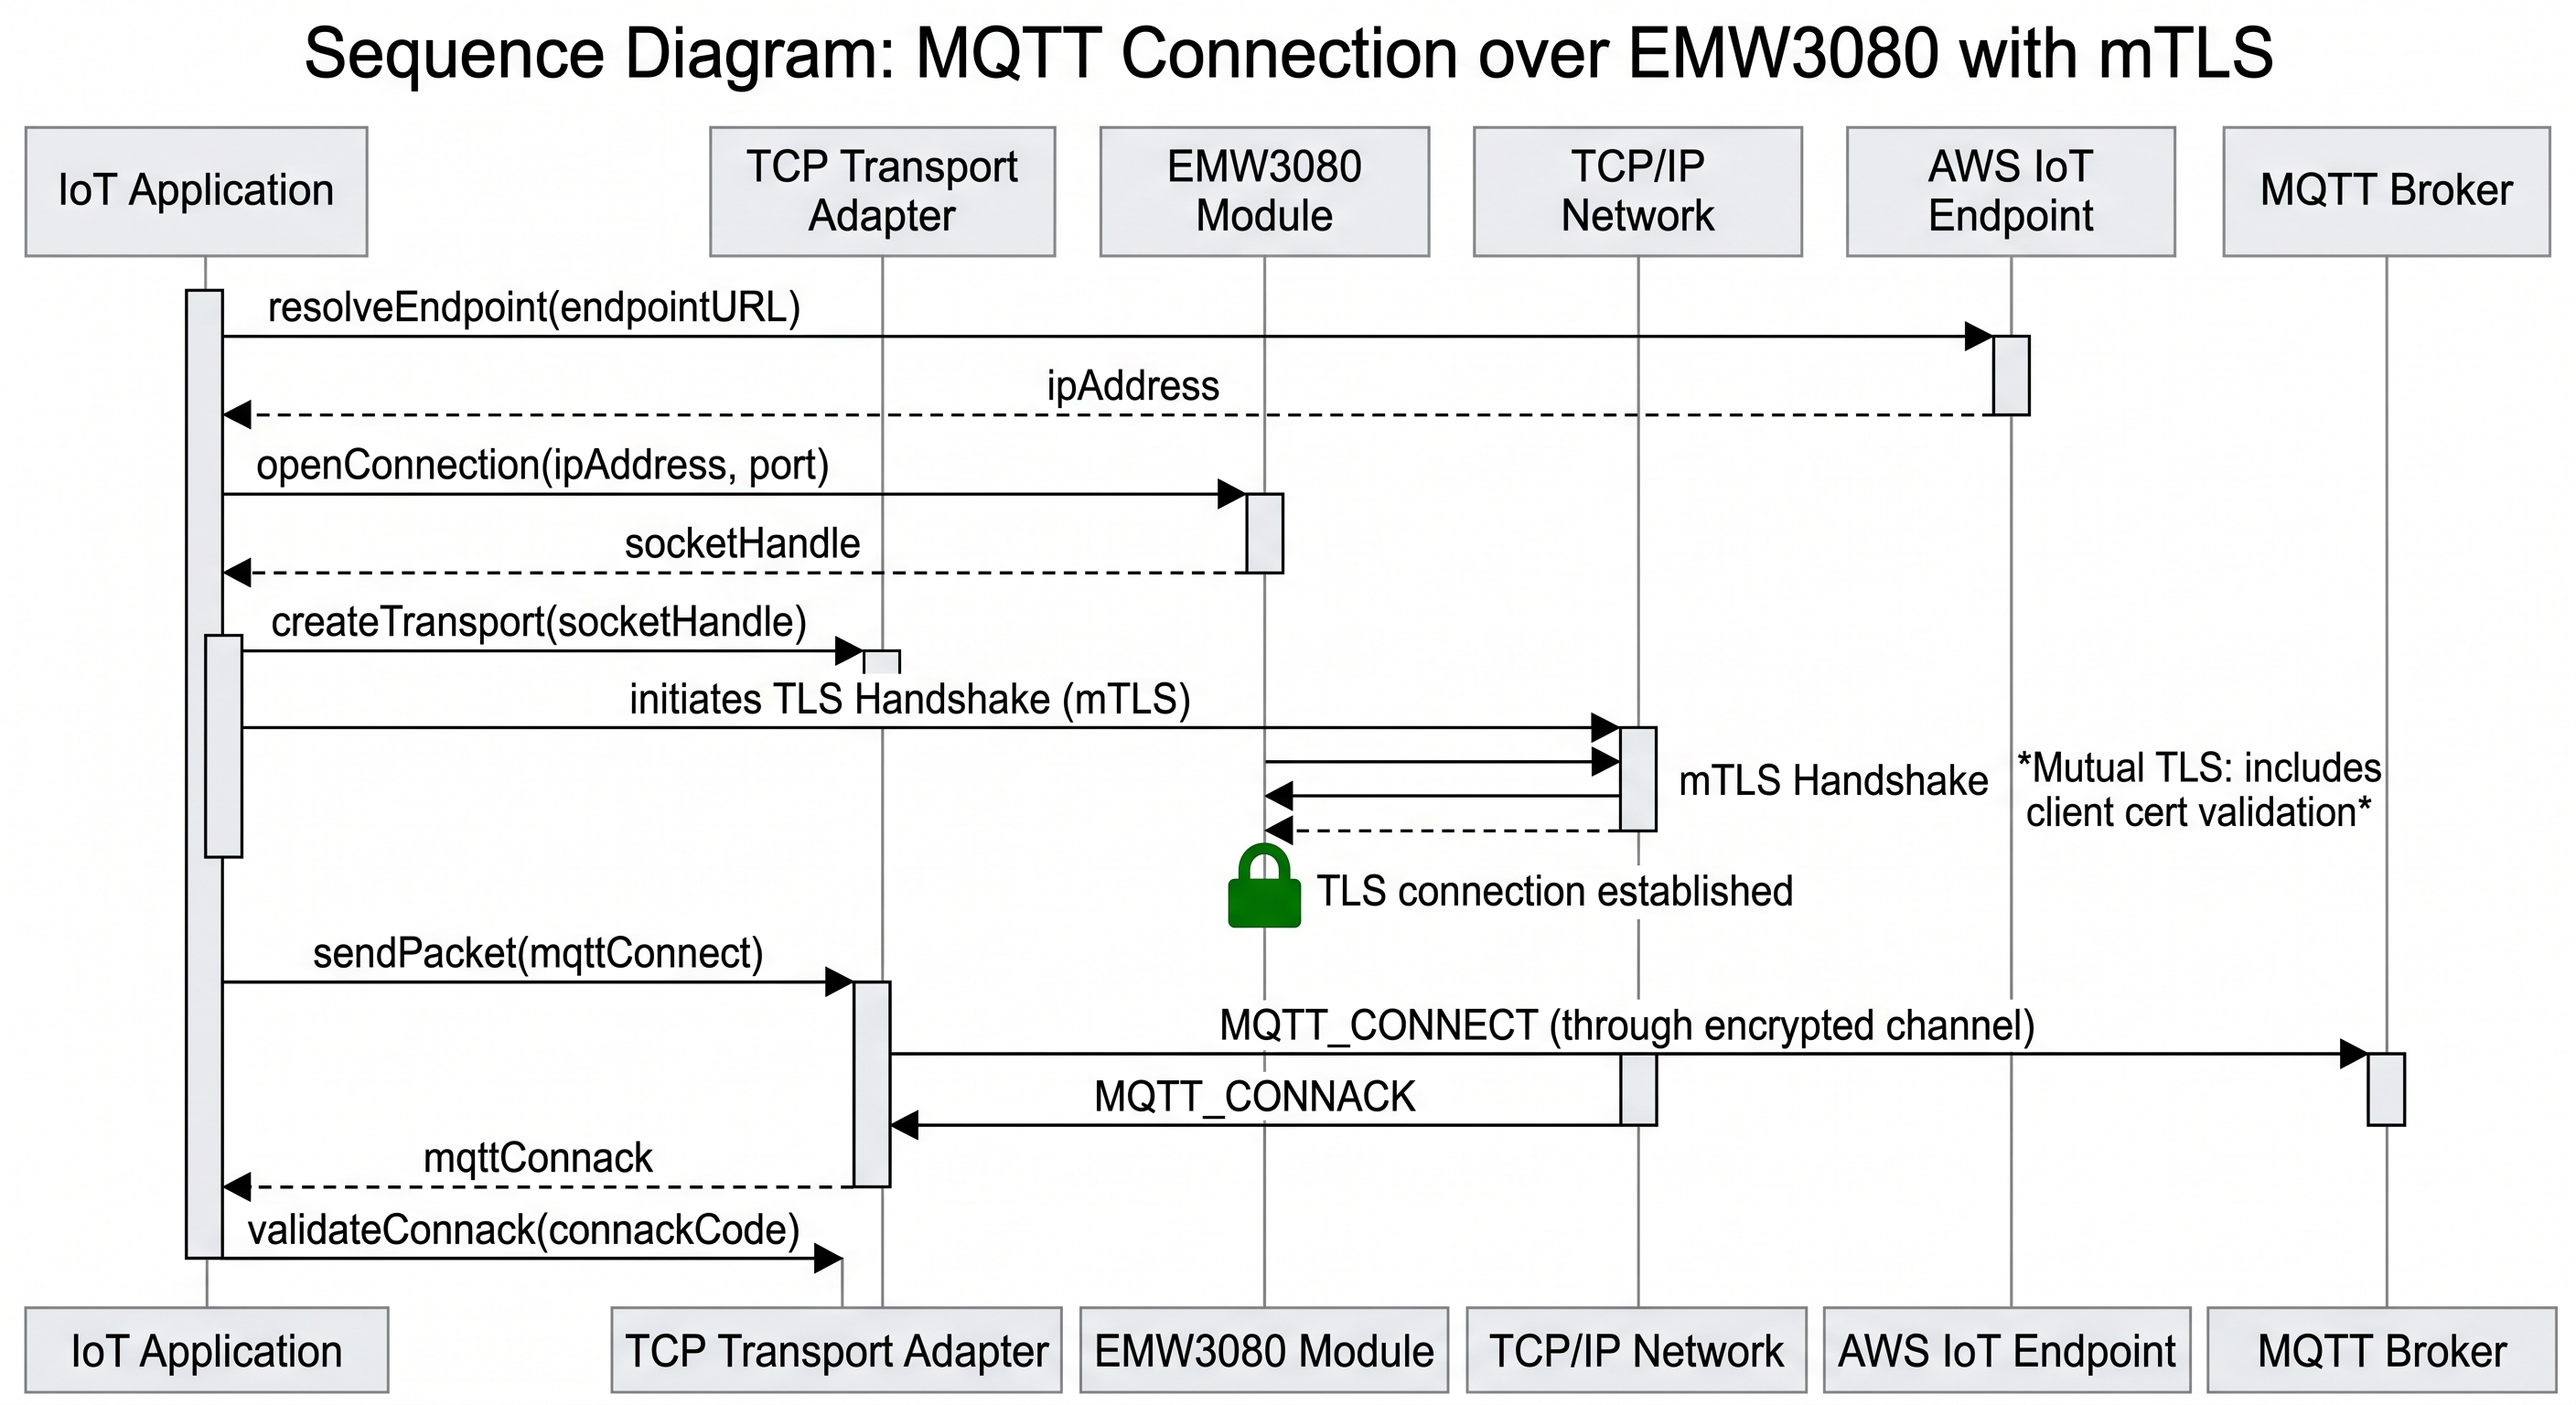
Publishing telemetry over the persistent TLS session
After the above steps succeed, the firmware enters the retained-session loop. Sensor acquisition and JSON encoding continue at their scheduled intervals, and each MQTT PUBLISH packet is sent through the existing TLS connection.
Establish TCP, TLS and MQTT once -> Publish telemetry with packet identifier 1 -> Receive PUBACK for packet identifier 1 -> Publish telemetry with packet identifier 2 -> Receive PUBACK for packet identifier 2 -> Continue while the connection remains healthy
Source files involved
The retained-session work uses the existing network and TLS modules and changes how main.rs owns them:
| Source file | Responsibility in the retained session |
|---|---|
application/src/main.rs | Owns the TLS buffers, establishes the session, runs the active-session loop, assigns packet identifiers, sends keep-alive packets, and controls reconnection. |
application/src/net/tcp_stream.rs | Adapts one open EMW3080 socket descriptor to the asynchronous Read and Write interfaces used by embedded-tls. |
application/src/net/mqtt.rs | Encodes MQTT CONNECT, QoS 1 PUBLISH, and PINGREQ packets, and validates CONNACK, PUBACK, and PINGRESP packets. |
application/src/tls_provider.rs | Supplies the TLS cipher suite, hardware-backed random-number source, server-certificate verifier, client certificate, and client-certificate signer. |
application/src/tls_credentials.rs | Includes the Amazon root CA, STM32U5 device certificate, and matching private key from build-time paths. |
application/src/config.rs | Defines the AWS IoT endpoint, port, MQTT client ID, telemetry topic, and 30-second MQTT keep-alive value. |
The adapter stores the socket descriptor returned by the EMW3080 module:
pub struct TcpStream<'a, 'd> { wifi: &'a mut Emw3080<'d>, descriptor: i32,}impl<'a, 'd> TcpStream<'a, 'd> { pub fn new(wifi: &'a mut Emw3080<'d>, descriptor: i32) -> Self { Self { wifi, descriptor } }}
Every TLS read or write is therefore routed through the same EMW3080 socket. The adapter remains inside TlsConnection until that connection is dropped.

TlsConnection owns the asynchronous TCP adapter, which routes every TLS read and write through the same open EMW3080 socket for the duration of the session.How the STM32 hardware RNG supports the TLS crypto provider
The selected crypto provider uses Aes128GcmSha256 as its TLS cipher-suite type. Its constructor binds the STM32 hardware random-number generator to the client credentials and creates a certificate verifier from the configured Amazon root CA:
let crypto_provider = AwsIotCryptoProvider::new( tls_rng, tls_credentials::ROOT_CA_DER, tls_credentials::CLIENT_CERTIFICATE_DER, tls_credentials::CLIENT_PRIVATE_KEY_DER,);
The UnsecureProvider name used inside tls_provider.rs refers to the software-held client credential provider. In this development configuration, the private key is compiled into the firmware image, so production provisioning still requires protected device storage.

AwsIotCryptoProvider connects embedded-tls to the STM32 hardware RNG, the client credentials, and the Amazon root CA verifier. The private key is currently stored in the firmware image, while the hardware RNG supplies the randomness required by TLS.Moving TLS ownership into the scheduler
The earlier publish_aws_iot_payload() function owned the complete connection sequence. Its TLS read and write buffers were local variables, so their lifetimes ended when the function returned. That structure was suitable for a one-message test but could not retain the TLS connection for later scheduler cycles. The TLS record buffers are now created outside the per-message publishing path:
const TLS_RECORD_BUFFER_SIZE: usize = 16_640;let mut tls_read_buffer = [0u8; TLS_RECORD_BUFFER_SIZE];let mut tls_write_buffer = [0u8; TLS_RECORD_BUFFER_SIZE];
Each buffer is 16,640 bytes. They are allocated once before the outer connection-management loop and borrowed by the TlsConnection. They stay alive for as long as the scheduler may retain that connection.
The session-establishment function borrows these buffers and the EMW3080 driver, constructs the TcpStream, performs the TLS and MQTT handshakes, and returns the open socket descriptor together with the live TlsConnection. The implementation is located in application/src/main.rs:
async fn establish_aws_iot_session<'a, 'd>( wifi: &'a mut Emw3080<'d>, tls_rng: &mut Rng<'_, peripherals::RNG>, tls_read_buffer: &'a mut [u8], tls_write_buffer: &'a mut [u8], log: &mut SerialLogger<'_>,) -> Option<( i32, TlsConnection<'a, TcpStream<'a, 'd>, Aes128GcmSha256>,)> { let address = match wifi.resolve_host_name(config::MQTT_HOST).await { Ok(address) => { logln!( log, "{} resolved to {}.{}.{}.{}", config::MQTT_HOST, address[0], address[1], address[2], address[3] ); address } Err(error) => { logln!(log, "AWS IoT address lookup failed: {:?}", error); return None; } }; let socket = match wifi .open_tcp_connection(address, config::MQTT_PORT) .await { Ok(socket) => socket, Err(error) => { logln!( log, "TCP connection to AWS IoT port {} failed: {:?}", config::MQTT_PORT, error ); return None; } }; logln!(log, "TCP connection to AWS IoT established"); let tcp_stream = TcpStream::new(wifi, socket); let tls_config = TlsConfig::new() .with_server_name(config::MQTT_HOST); let crypto_provider = AwsIotCryptoProvider::new( tls_rng, tls_credentials::ROOT_CA_DER, tls_credentials::CLIENT_CERTIFICATE_DER, tls_credentials::CLIENT_PRIVATE_KEY_DER, ); let mut tls_connection: TlsConnection<'_, TcpStream<'_, '_>, Aes128GcmSha256> = TlsConnection::new( tcp_stream, tls_read_buffer, tls_write_buffer, ); logln!(log, "AWS IoT TLS handshake starting"); let handshake_result = tls_connection .open(TlsContext::new(&tls_config, crypto_provider)) .await; match handshake_result { Ok(()) => { logln!( log, "AWS IoT TLS handshake completed successfully" ); let mut mqtt_connect_packet = [0u8; 128]; let mqtt_connect_length = match mqtt::encode_connect( &mut mqtt_connect_packet, config::MQTT_CLIENT_ID, config::MQTT_KEEP_ALIVE_SECONDS, ) { Ok(length) => length, Err(error) => { logln!( log, "MQTT CONNECT encoding failed: {:?}", error ); drop(tls_connection); return None; } }; if let Err(error) = tls_connection .write_all( &mqtt_connect_packet[..mqtt_connect_length], ) .await { logln!( log, "MQTT CONNECT TLS write failed: {:?}", error ); drop(tls_connection); return None; } if let Err(error) = tls_connection.flush().await { logln!( log, "MQTT CONNECT TLS flush failed: {:?}", error ); drop(tls_connection); return None; } let mut connack = [0u8; 4]; if let Err(error) = tls_connection.read_exact(&mut connack).await { logln!( log, "MQTT CONNACK TLS read failed: {:?}", error ); drop(tls_connection); return None; } if let Err(error) = mqtt::parse_connack(&connack) { logln!(log, "MQTT CONNACK rejected: {:?}", error); drop(tls_connection); return None; } logln!( log, "AWS IoT MQTT persistent session established" ); Some((socket, tls_connection)) } Err(error) => { logln!(log, "AWS IoT TLS handshake failed: {:?}", error); drop(tls_connection); None } }}
The function establish_aws_iot_session performs four distinct jobs.
- Resolve the AWS IoT endpoint.
resolve_host_name()obtains the address of the configured AWS IoT endpoint. - Open the TCP connection.
open_tcp_connection()asks the EMW3080 module to open a socket and returns the module’s numeric socket descriptor. - Create the transport adapter and establish mutual TLS.
TcpStream::new()combines that descriptor with a mutable reference to the Rust driver so the TLS library can use the module through asynchronousReadandWriteoperations.TlsConfig::with_server_name()supplies the AWS IoT hostname used during TLS establishment.AwsIotCryptoProvidersupplies the Amazon root CA, the STM32U5 client certificate, its matching private key, and the STM32 hardware random-number generator. The TLS connection then performs the mutual TLS handshake over theTcpStream. - Establish the MQTT session. The completed TLS handshake establishes the encrypted transport but does not establish MQTT. The function therefore encodes and sends one MQTT
CONNECTpacket and reads the broker’s four-byteCONNACK. It returns the connection only aftermqtt::parse_connack()accepts that response.
The return type expresses the ownership relationship directly. The returned TlsConnection contains the TCP adapter, and the adapter holds a mutable borrow of the EMW3080 Rust driver for the lifetime of the connection. The scheduler performs network reads and writes through the TlsConnection while the session is active.
This ownership arrangement also determines how the firmware handles a connection failure. The TlsConnection owns the TcpStream, and the TcpStream holds a mutable borrow of the EMW3080 Rust driver. While the TLS connection exists, Rust cannot allow the same driver to be borrowed mutably again to close the socket. The outer session-control loop therefore handles the cleanup. When session establishment or an active-session operation fails, the TLS connection is dropped first, releasing its borrow of the driver. The outer loop then resets the Wi-Fi path and retries the connection.
Publishing several messages through the same connection
The revised publish_aws_iot_payload() function no longer resolves the endpoint or performs either handshake. It receives a mutable reference to the active TLS connection and writes one QoS 1 MQTT packet through it:
async fn publish_aws_iot_payload( tls_connection: &mut TlsConnection<'_, TcpStream<'_, '_>, Aes128GcmSha256>, payload: &str, packet_identifier: u16, log: &mut SerialLogger<'_>,) -> bool { let mut mqtt_publish_packet = [0u8; 1024]; let mqtt_publish_length = match mqtt::encode_publish_qos_1( &mut mqtt_publish_packet, config::MQTT_TOPIC, payload.as_bytes(), packet_identifier, ) { Ok(length) => length, Err(error) => { logln!(log, "MQTT PUBLISH encoding failed: {:?}", error); return false; } }; if let Err(error) = tls_connection .write_all(&mqtt_publish_packet[..mqtt_publish_length]) .await { logln!(log, "MQTT PUBLISH TLS write failed: {:?}", error); return false; } if let Err(error) = tls_connection.flush().await { logln!(log, "MQTT PUBLISH TLS flush failed: {:?}", error); return false; } logln!( log, "AWS IoT MQTT telemetry publish sent packet_id={}", packet_identifier ); let mut publish_acknowledgement = [0u8; 4]; if let Err(error) = tls_connection .read_exact(&mut publish_acknowledgement) .await { logln!(log, "MQTT PUBACK TLS read failed: {:?}", error); return false; } if let Err(error) = mqtt::parse_publish_acknowledgement( &publish_acknowledgement, packet_identifier, ) { logln!(log, "MQTT PUBACK validation failed: {:?}", error); return false; } logln!( log, "AWS IoT MQTT PUBACK received packet_id={}", packet_identifier ); true}
encode_publish_qos_1() writes the MQTT fixed header, remaining length, topic, packet identifier, and JSON payload into a fixed 1,024-byte buffer. No heap allocation is required. The function writes only the encoded portion of that buffer to the TLS connection and calls flush() so the pending TLS data is passed to the underlying transport.
The function then reads the four-byte MQTT 3.1.1 PUBACK packet and validates both its packet type and packet identifier. A successful return therefore means that a matching PUBACK was received from the broker. The function processes one publication at a time, so only one QoS 1 packet is awaiting acknowledgement.
Each QoS 1 publication uses a non-zero packet identifier. The identifier is incremented after the matching PUBACK has been validated:
next_packet_identifier = next_packet_identifier.wrapping_add(1);if next_packet_identifier == 0 { next_packet_identifier = 1;}
The wrap handling skips zero because MQTT 3.1.1 requires the packet identifier in a QoS 1 PUBLISH packet to be non-zero. Reusing an identifier after it has been acknowledged is permitted because no earlier QoS 1 exchange with that identifier remains in flight.
The scheduler resets mqtt_idle_ticks only after a successful publish and advances the packet identifier at the same point:
if publish_aws_iot_payload( &mut tls_connection, telemetry_json.as_str(), next_packet_identifier, &mut log,).await{ logln!( log, "TRACE 34: AWS IoT telemetry publish PASS seq={}", heartbeat_count ); mqtt_idle_ticks = 0; next_packet_identifier = next_packet_identifier.wrapping_add(1); if next_packet_identifier == 0 { next_packet_identifier = 1; }} else { logln!( log, "TRACE 34: AWS IoT telemetry publish FAILED seq={}", heartbeat_count ); break;}
Returning false breaks the inner retained-session loop. The code does not continue publishing through a connection after a TLS write, TLS read, flush, or MQTT acknowledgement failure.
Keeping an idle MQTT connection alive
The MQTT CONNECT packet advertises a keep-alive value of 30 seconds. Successful telemetry publications generate MQTT traffic, so the connection is not idle while messages continue to flow.
The firmware also tracks the time since the last successful publication. If the connection remains idle for 20 seconds, it sends PINGREQ through the TLS connection and waits for PINGRESP:
async fn send_aws_iot_keep_alive( tls_connection: &mut TlsConnection<'_, TcpStream<'_, '_>, Aes128GcmSha256>, log: &mut SerialLogger<'_>,) -> bool { let mut request = [0u8; 2]; let request_length = match mqtt::encode_ping_request(&mut request) { Ok(length) => length, Err(error) => { logln!(log, "MQTT PINGREQ encoding failed: {:?}", error); return false; } }; if let Err(error) = tls_connection .write_all(&request[..request_length]) .await { logln!(log, "MQTT PINGREQ TLS write failed: {:?}", error); return false; } if let Err(error) = tls_connection.flush().await { logln!(log, "MQTT PINGREQ TLS flush failed: {:?}", error); return false; } logln!(log, "AWS IoT MQTT PINGREQ sent"); let mut response = [0u8; 2]; if let Err(error) = tls_connection.read_exact(&mut response).await { logln!(log, "MQTT PINGRESP TLS read failed: {:?}", error); return false; } if let Err(error) = mqtt::parse_ping_response(&response) { logln!(log, "MQTT PINGRESP validation failed: {:?}", error); return false; } logln!(log, "AWS IoT MQTT PINGRESP received"); true}
MQTT PINGREQ and PINGRESP are both two-byte control packets. The function sends the request through the same TLS connection used for telemetry and accepts success only after parse_ping_response() validates the response.
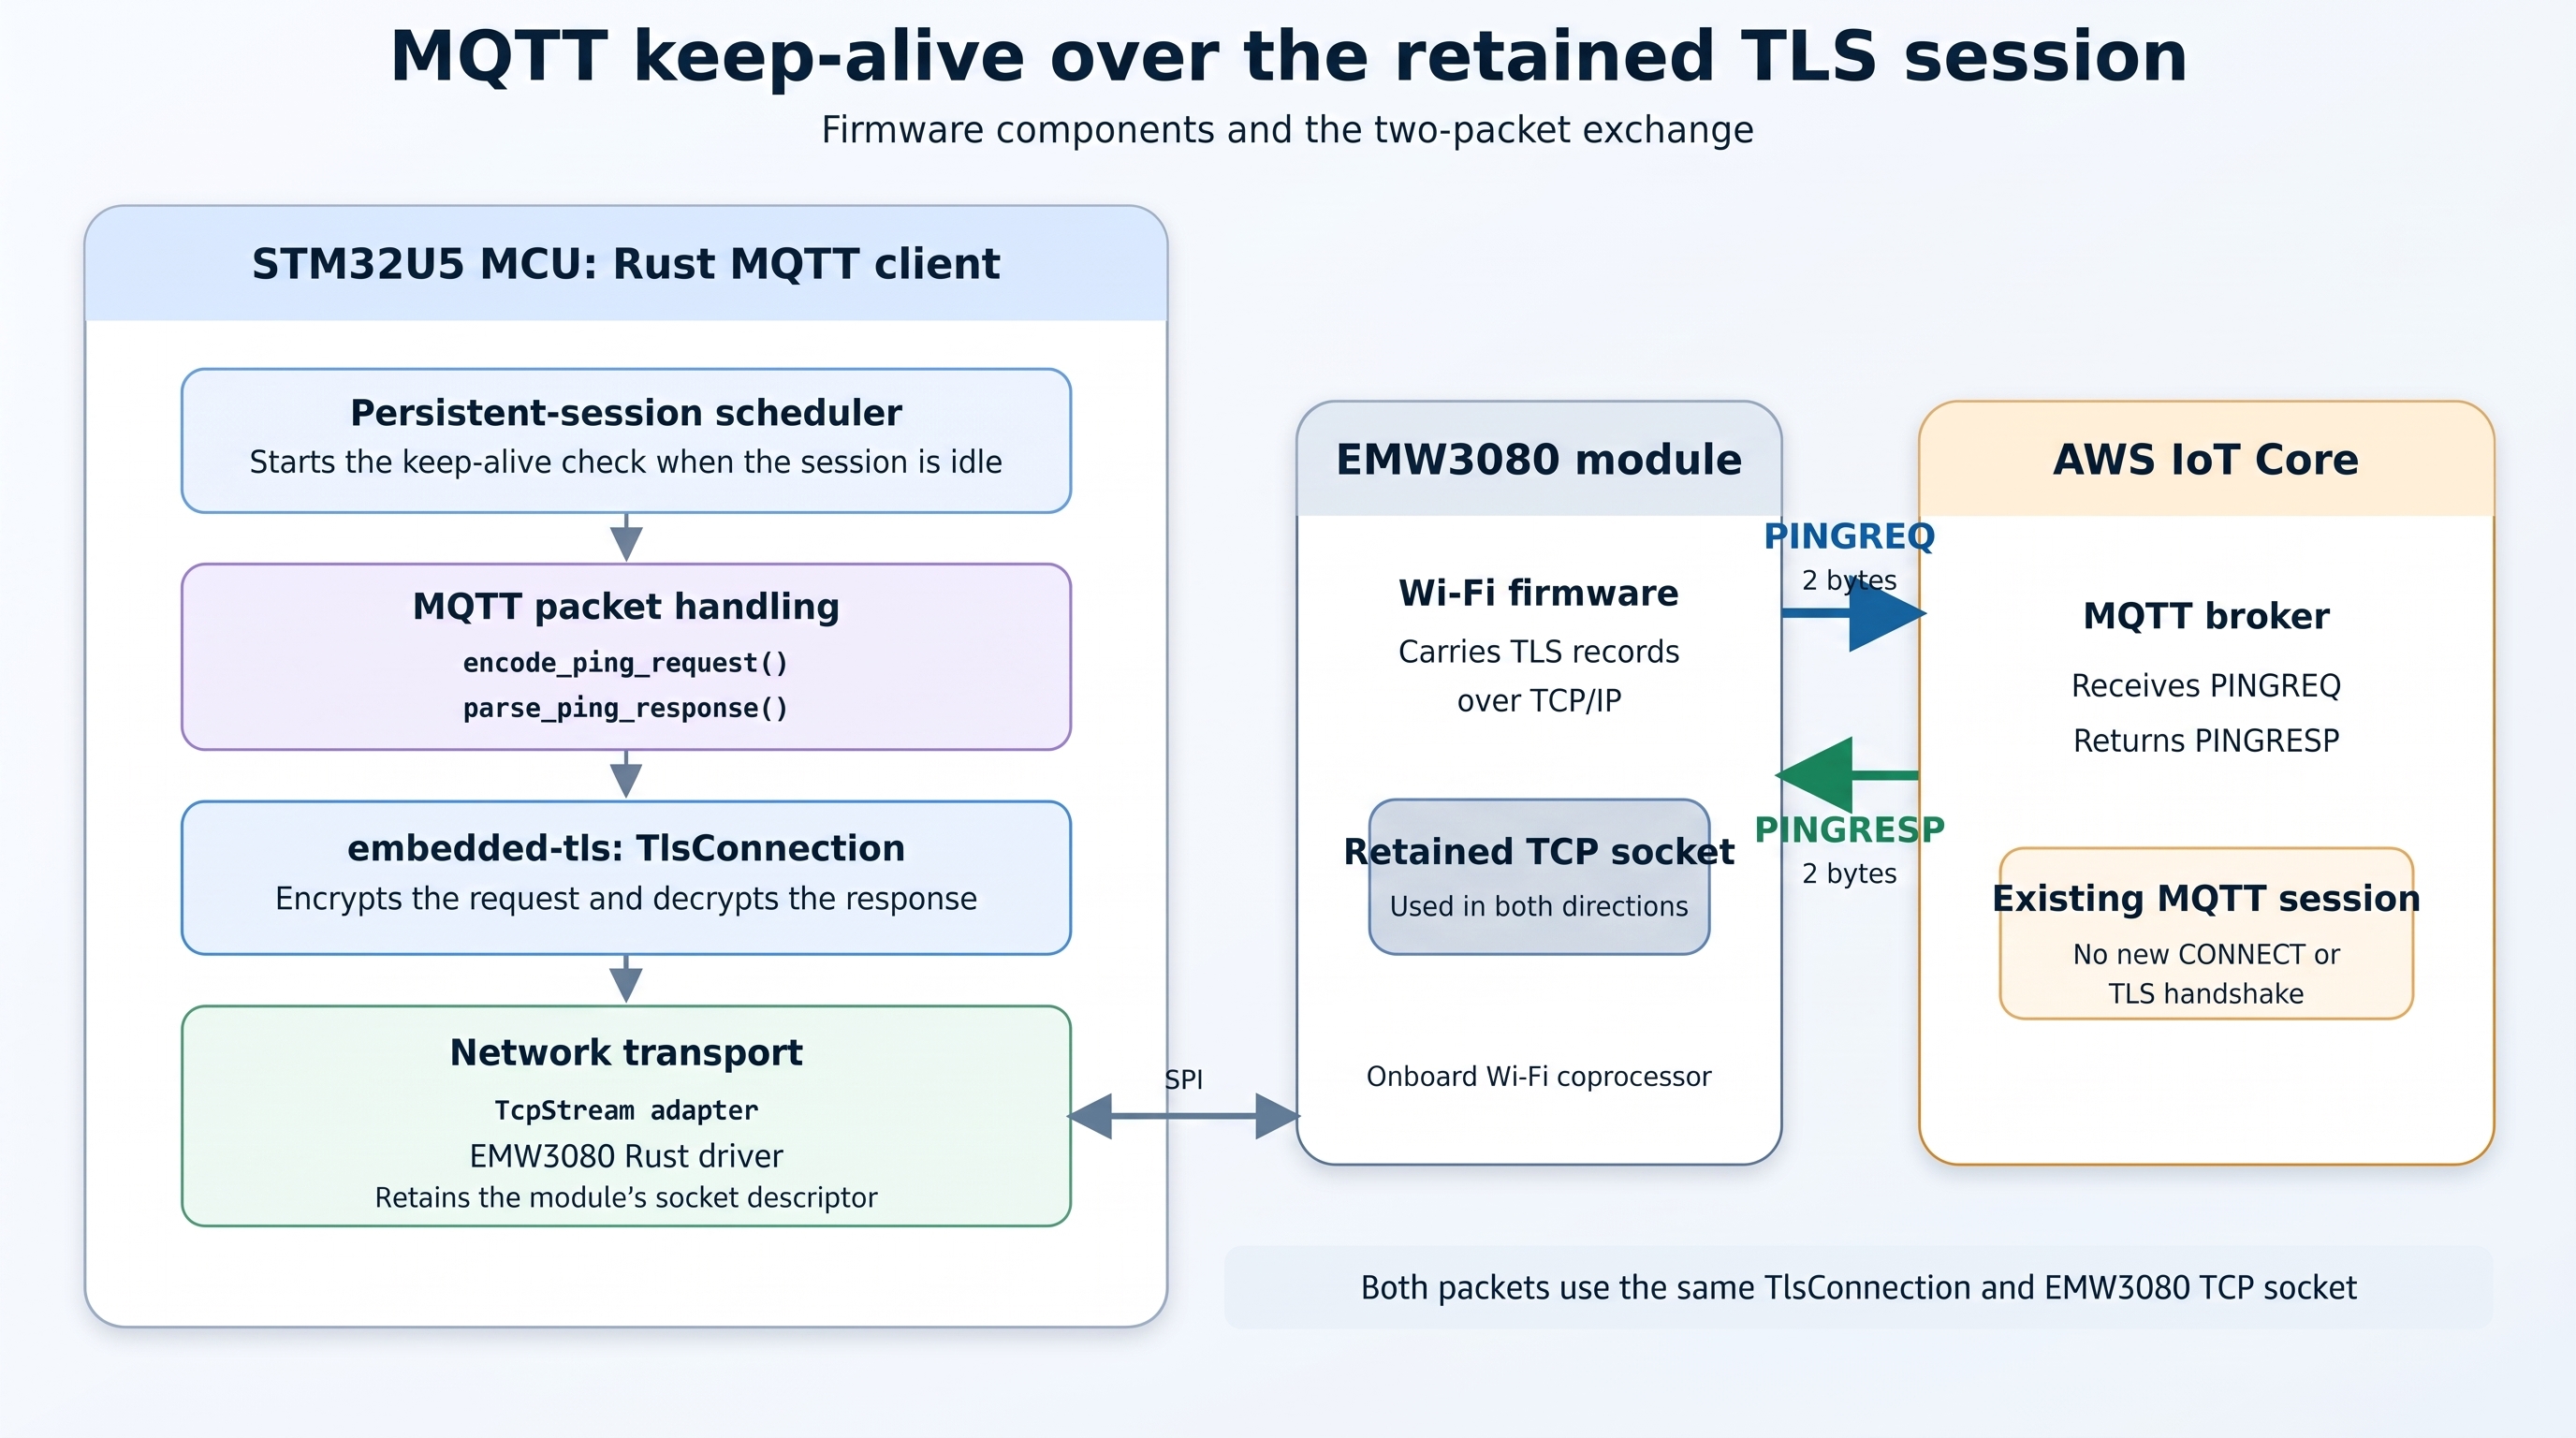
The scheduler calls the keep-alive function from its normal 50-millisecond tick processing:
const MQTT_KEEP_ALIVE_INTERVAL_TICKS: u32 = 400;if mqtt_idle_ticks >= MQTT_KEEP_ALIVE_INTERVAL_TICKS { if !send_aws_iot_keep_alive(&mut tls_connection, &mut log).await { break; } mqtt_idle_ticks = 0;}
The scheduler base period is 50 milliseconds, so 400 ticks correspond to 20 seconds. This occurs before the advertised 30-second keep-alive interval expires. A valid PINGRESP resets the idle counter. A failed write, read, or response validation ends the active-session loop and starts recovery.
Under the normal one-second telemetry schedule, successful PUBLISH and PUBACK exchanges reset the idle counter long before it reaches 20 seconds. PINGREQ is used when the connection remains open without a successful telemetry publication for that interval.
The outer and inner scheduler loops
The scheduler now has two loops. The outer loop owns connection establishment and recovery. The inner loop owns sensor acquisition, JSON encoding, telemetry publication, and keep-alive traffic while the connection remains usable.
The following source from application/src/main.rs shows the connection-management part of that structure:
loop { if !network_ready { Timer::after_secs(AWS_IOT_RECONNECT_DELAY_SECONDS).await; network_ready = bring_up_wifi(&mut wifi, &mut log).await; if !network_ready { logln!(log, "Wi-Fi retry failed"); continue; } } let (socket, mut tls_connection) = match establish_aws_iot_session( &mut wifi, &mut tls_rng, &mut tls_read_buffer, &mut tls_write_buffer, &mut log, ) .await { Some(session) => session, None => { network_ready = false; logln!( log, "AWS IoT session establishment failed; \ Wi-Fi will be reset and retried" ); continue; } }; let mut scheduler_tick = 0u32; let mut mqtt_idle_ticks = 0u32; let mut next_packet_identifier = 1u16; let mut ticker = Ticker::every( Duration::from_millis(BASE_PERIOD_MS), ); loop { // Existing sensor acquisition, JSON encoding, // QoS 1 publication and keep-alive processing. ticker.next().await; } drop(tls_connection); let _ = wifi.close(socket).await; network_ready = false; logln!( log, "AWS IoT session lost; reconnecting after {} seconds", AWS_IOT_RECONNECT_DELAY_SECONDS );}
The connection object remains in scope throughout the inner loop. Leaving that loop drops the TlsConnection explicitly before calling wifi.close(socket). That ordering releases the mutable borrow held through TcpStream, allowing the EMW3080 driver to close the correct socket descriptor.
Recovering after a connection failure
The retained connection can end because of a TCP failure, TLS failure, missing or invalid MQTT acknowledgement, Wi-Fi interruption, or keep-alive failure. Once an active session fails, the scheduler uses the following recovery path:
Leave the active-session loop -> Drop the TLS connection -> Close the EMW3080 socket -> Mark the network unavailable -> Wait 10 seconds -> Bring up Wi-Fi again -> Establish a new TCP, TLS and MQTT connection
If session establishment fails before an active session is returned, the outer loop marks the network unavailable and resets the Wi-Fi path on the next attempt. The 10-second delay prevents the firmware from continuously resetting the Wi-Fi module and repeating TLS handshakes while the access point or AWS IoT endpoint is unavailable.
Building and deploying the firmware
The certificate paths are still supplied at compile time because include_bytes! embeds the DER files into the firmware image. The build environment is loaded by application/setup_build_env.sh, and application/flash.sh prepares the ELF filename and invokes STM32CubeProgrammer.
A repository-level build_and_deploy.sh script now runs the complete sequence:
#!/usr/bin/env bashset -euo pipefailSCRIPT_DIR="$(cd -- "$(dirname -- "${BASH_SOURCE[0]}")" && pwd)"APPLICATION_DIR="$SCRIPT_DIR/application"cd "$APPLICATION_DIR"source ./setup_build_env.shcargo fmt --checkcargo build./flash.sh
Keeping the environment setup and flash commands in separate scripts also allows them to be run independently when required.
Verifying the retained connection on the board
The merged main branch was built, flashed to the B-U585I-IOT02A board, and observed through the UART output. The trace records the Wi-Fi connection, endpoint resolution, TCP connection, TLS handshake, MQTT establishment, QoS 1 publication, and matching PUBACK:
TRACE 30: persistent AWS IoT scheduler startingTCP connection to AWS IoT establishedAWS IoT TLS handshake startingAWS IoT TLS handshake completed successfullyAWS IoT MQTT persistent session establishedTRACE 33: AWS IoT telemetry publish begin seq=0 packet_id=1AWS IoT MQTT telemetry publish sent packet_id=1AWS IoT MQTT PUBACK received packet_id=1TRACE 34: AWS IoT telemetry publish PASS seq=0
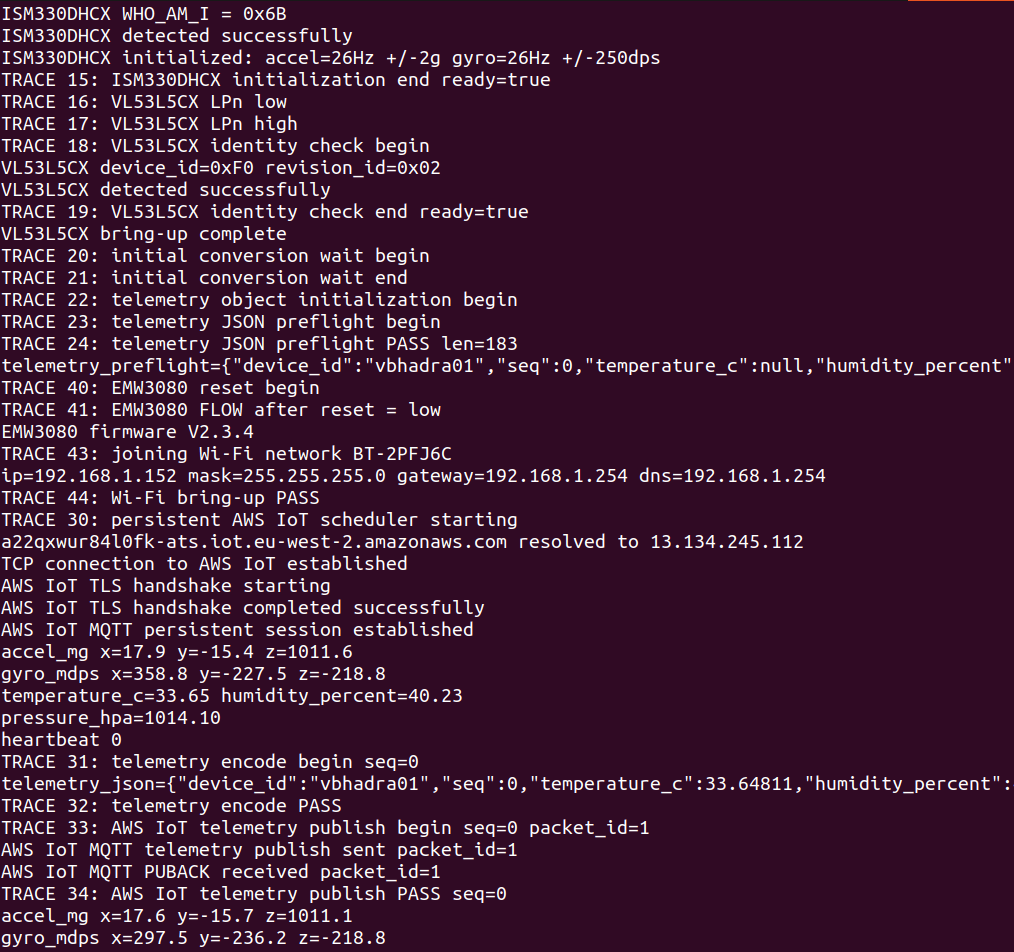
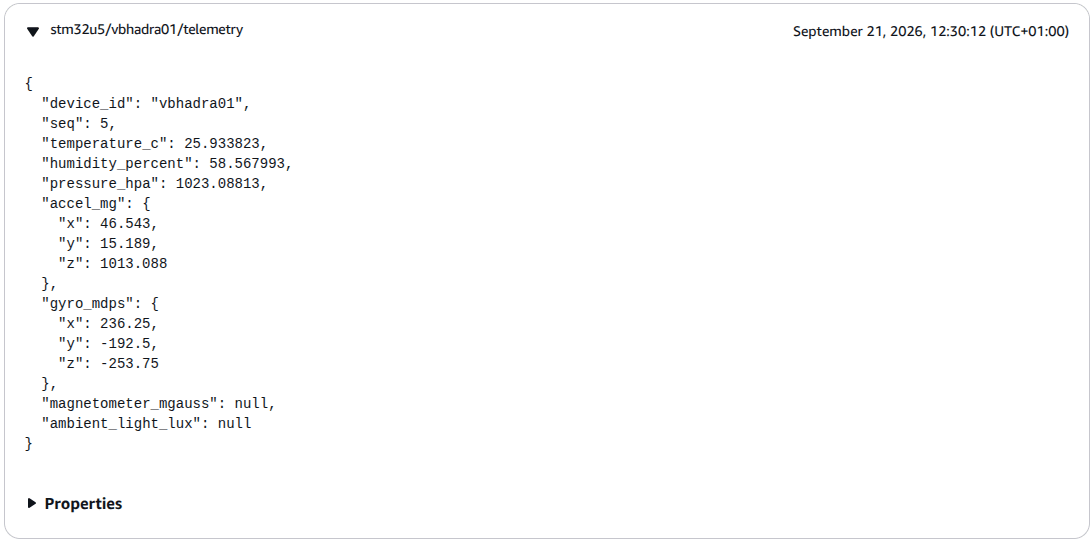
main branch showing session establishment and the first acknowledged QoS 1 publication.The first PUBACK proves that AWS IoT Core accepted that QoS 1 publication. Verification of connection reuse requires subsequent packet identifiers and sequence numbers to appear without another TCP connection, TLS handshake, or MQTT CONNECT exchange between them. The AWS IoT MQTT test client must be opened in the same AWS Region as the device endpoint. This project uses eu-west-2, so the test client was opened in Europe (London) and subscribed to:
stm32u5/vbhadra01/telemetry
Messages published before the test client subscribes are not displayed unless they were published with the MQTT retained-message flag. The firmware’s telemetry publications are observed after the subscription becomes active.
Milestone status
The implementation now establishes one TCP connection, completes one mutual TLS handshake, and creates one MQTT connection before entering the telemetry loop. QoS 1 publications reuse that live connection, and each publication is checked against its corresponding PUBACK. MQTT keep-alive traffic is sent during an idle period, and a connection failure returns the firmware to the controlled reconnection path. The feature has been verified on the STM32U5 board and merged into main.
The next phase will build on this retained connection by routing the telemetry received through AWS IoT Core into an AI/ML processing pipeline for environmental prediction and anomaly detection.
Discover more from Tech For Talk
Subscribe to get the latest posts sent to your email.
Leave a Reply