 by
by 
So far in this project, we collected sensor data from the B-U585I-IOT02A board and published it to the public MQTT test broker, test.mosquitto.org. The previous post described how to provision AWS IoT Core for the STM32 device.
Now, in this phase, we will replace the public test broker with AWS IoT Core and establish an MQTT connection protected by mutual TLS between the STM32 and AWS IoT Core.
Before connecting the STM32, we will test the TLS connection between an Ubuntu host and AWS IoT Core using a known MQTT client. This separates the verification steps of the cloud configuration from the embedded implementation and confirms that the AWS IoT endpoint, CA certificate, device certificate, private key, and IoT policy are configured correctly.
Step 1: Prepare the AWS MQTT test client
Open the MQTT test client from the AWS IoT Core console.


In the AWS IoT Core console:
- Confirm the Region depending on where you are geographically located; in our case, it is Europe (London),
eu-west-2. - In the left navigation panel, select Test → MQTT test client.
- Open Subscribe to a topic.
- Enter a topic filter. For our purposes, we will use the following topic filter:
stm32u5/vbhadra01/telemetry
- Leave the remaining settings unchanged.
- Select Subscribe.
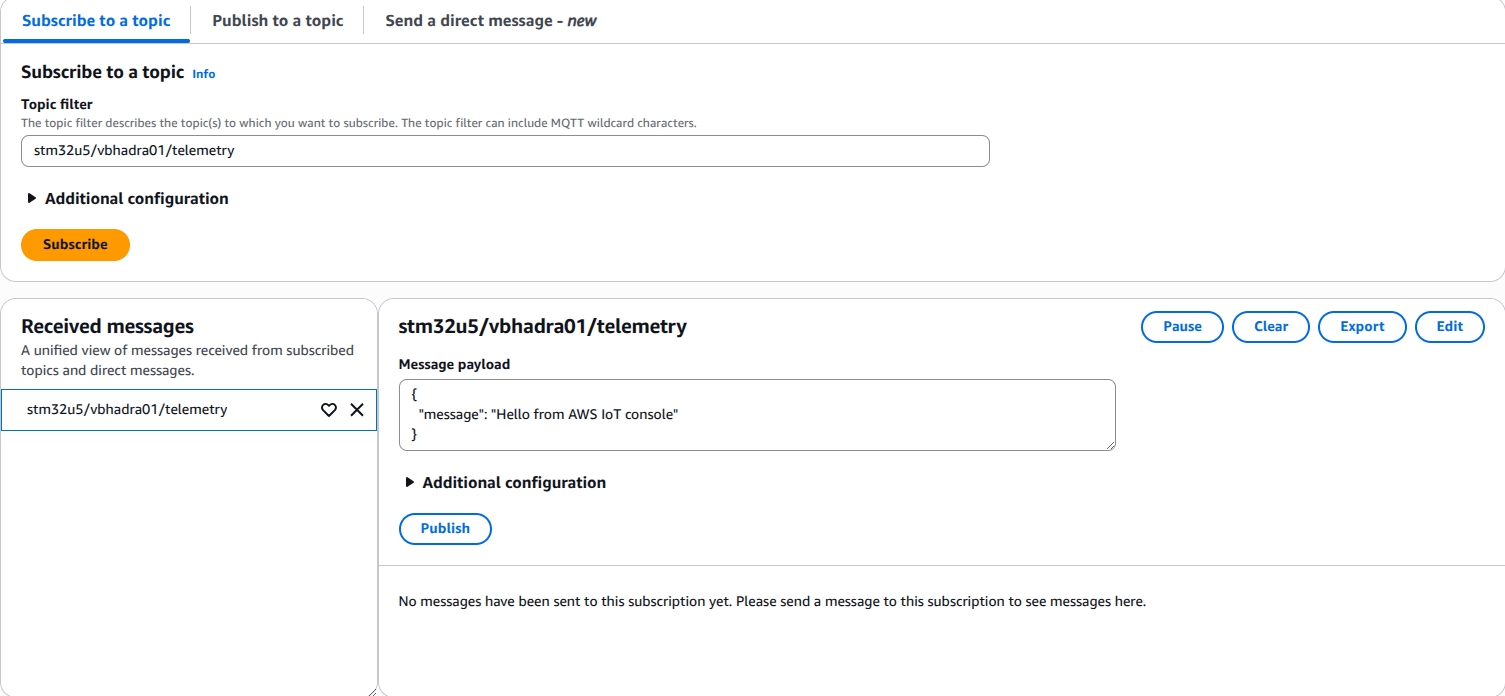
The subscription is active on the correct topic:
stm32u5/vbhadra01/telemetry
Keep this browser page open.
Publishing a test message over TLS
The following command establishes an MQTT connection to the account-specific AWS IoT endpoint on TCP port 8883. It uses Amazon Root CA 1 to authenticate the AWS server and the downloaded device certificate and private key to authenticate the MQTT client. We have described how to create all the required certificates and download them from AWS in the previous post.
Readers following this procedure must replace <AWS_IOT_ENDPOINT>, <CERTIFICATE_FILE> and <PRIVATE_KEY_FILE> with the values and filenames created in their own AWS account. We have explained in the previous post how to generate the device certificate and private key and obtain the account-specific AWS IoT endpoint.
mosquitto_pub \ --host <AWS_IOT_ENDPOINT> \ --port 8883 \ --cafile "$HOME/Documents/IoT_Certs/AmazonRootCA1.pem" \ --cert "$HOME/Documents/IoT_Certs/<CERTIFICATE_FILE>" \ --key "$HOME/Documents/IoT_Certs/<PRIVATE_KEY_FILE>" \ --id stm32u5-vbhadra01 \ --topic stm32u5/vbhadra01/telemetry \ --message '{"source":"ubuntu","test":"aws-iot-tls","status":"ok"}' \ --qos 0 \ --debug
The command uses:
- TCP port
8883for MQTT over TLS - Amazon Root CA 1 for server-certificate validation
- The X.509 device certificate and its private key for client authentication
- MQTT client ID
stm32u5-vbhadra01 - Topic
stm32u5/vbhadra01/telemetry - QoS 0, matching the current STM32 telemetry implementation
- Debug output so that the MQTT connection sequence can be inspected
Terminal result
The actual terminal output was:
Client stm32u5-vbhadra01 sending CONNECTClient stm32u5-vbhadra01 received CONNACK (0)Client stm32u5-vbhadra01 sending PUBLISH (d0, q0, r0, m1, 'stm32u5/vbhadra01/telemetry', ... (54 bytes))Client stm32u5-vbhadra01 sending DISCONNECT
The CONNACK (0) response confirms that AWS IoT Core accepted the MQTT connection. The response arrived through the established TLS session, which confirms that the server certificate was verified, AWS IoT Core accepted the device certificate, and the client proved that it held the corresponding private key.
The client connected with the permitted client ID and sent a 54-byte MQTT PUBLISH packet to the configured telemetry topic.
The message was published with QoS 0, so the broker did not return a publish acknowledgement. The sending PUBLISH line confirms that mosquitto_pub transmitted the packet, but confirmation that the subscriber received it must come from the AWS IoT MQTT test client.

Verifying message delivery
The AWS MQTT test client was subscribed to the same telemetry topic and was expected to display the following payload:
{ "source": "ubuntu", "test": "aws-iot-tls", "status": "ok"}
The received message in the AWS MQTT test client provides the independent evidence required to confirm end-to-end delivery through AWS IoT Core.
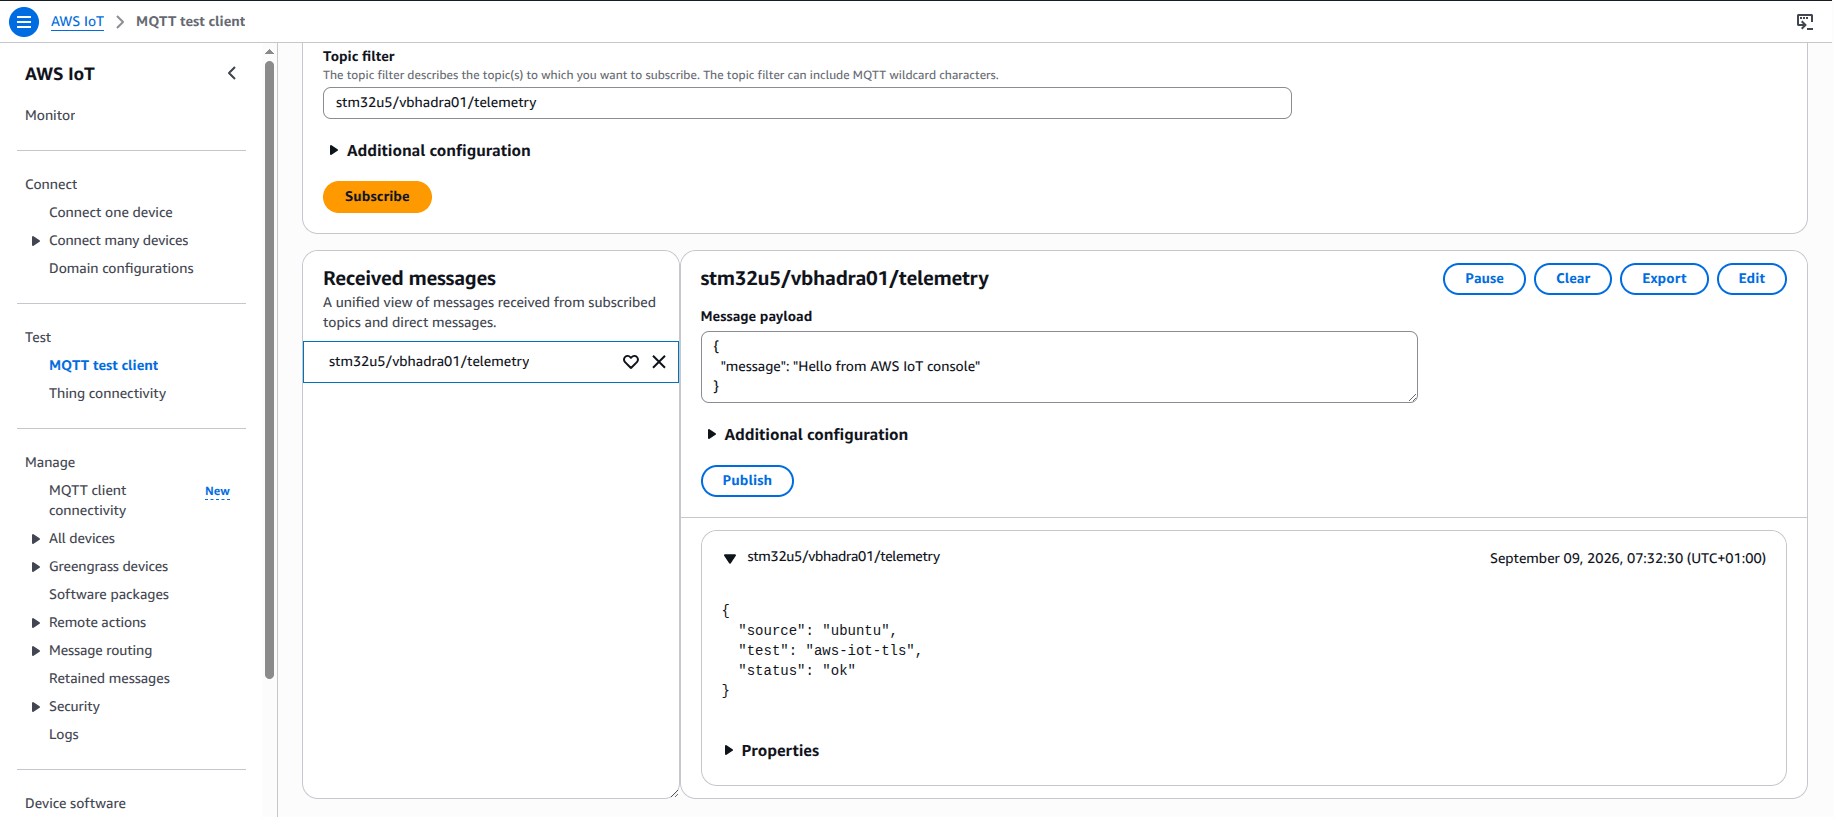
Once the AWS test client receives and displays the message, the Ubuntu-to-AWS MQTT-over-TLS test can be considered fully verified.
Starting the STM32 TLS integration
Now we’ll add a TLS connection to the STM32 Rust application. The complete data and control path will be as follows:
| Processing stage | Rust crate or project module | Role in the implementation |
|---|---|---|
| Sensor acquisition | embassy-stm32, embedded-hal and application/src/sensors/ | embassy-stm32 provides the STM32U5 I²C peripheral implementation. The project’s sensor drivers use embedded_hal::i2c::I2c to communicate with the onboard sensors. |
| JSON encoding | core::fmt and application/src/telemetry/json.rs | The project’s JsonBuffer stores JSON in a fixed-size byte array. core::fmt::Write is used to write the telemetry fields into that buffer. |
| MQTT packet construction | application/src/net/mqtt.rs | The project constructs and parses MQTT 3.1.1 packets using fixed byte buffers. No external MQTT crate is used. |
| EMW3080 Wi-Fi and TCP transport | embassy-stm32, embassy-time, application/src/net/spi_link.rs and application/src/net/emw3080.rs | embassy-stm32 provides blocking SPI and GPIO access. embassy-time Provides timers and timeout measurement. The project modules implement the EMW3080 SPI protocol, Wi-Fi commands, and TCP operations. |
| Earlier public MQTT broker test | test.mosquitto.org on TCP port 1883 | This was the broker used by the earlier non-TLS implementation. Its configuration remains commented out in application/src/config.rs and is not active in the attached AWS IoT branch. |
The project implements the subset of MQTT 3.1.1 needed by the STM32 telemetry publisher. It constructs the CONNECT, PUBLISH and PINGREQ packets sent to AWS IoT Core and processes the CONNACK and PINGRESP packets returned by the broker.
CONNECT- QoS 0
PUBLISH PINGREQCONNACKprocessingPINGRESPprocessing
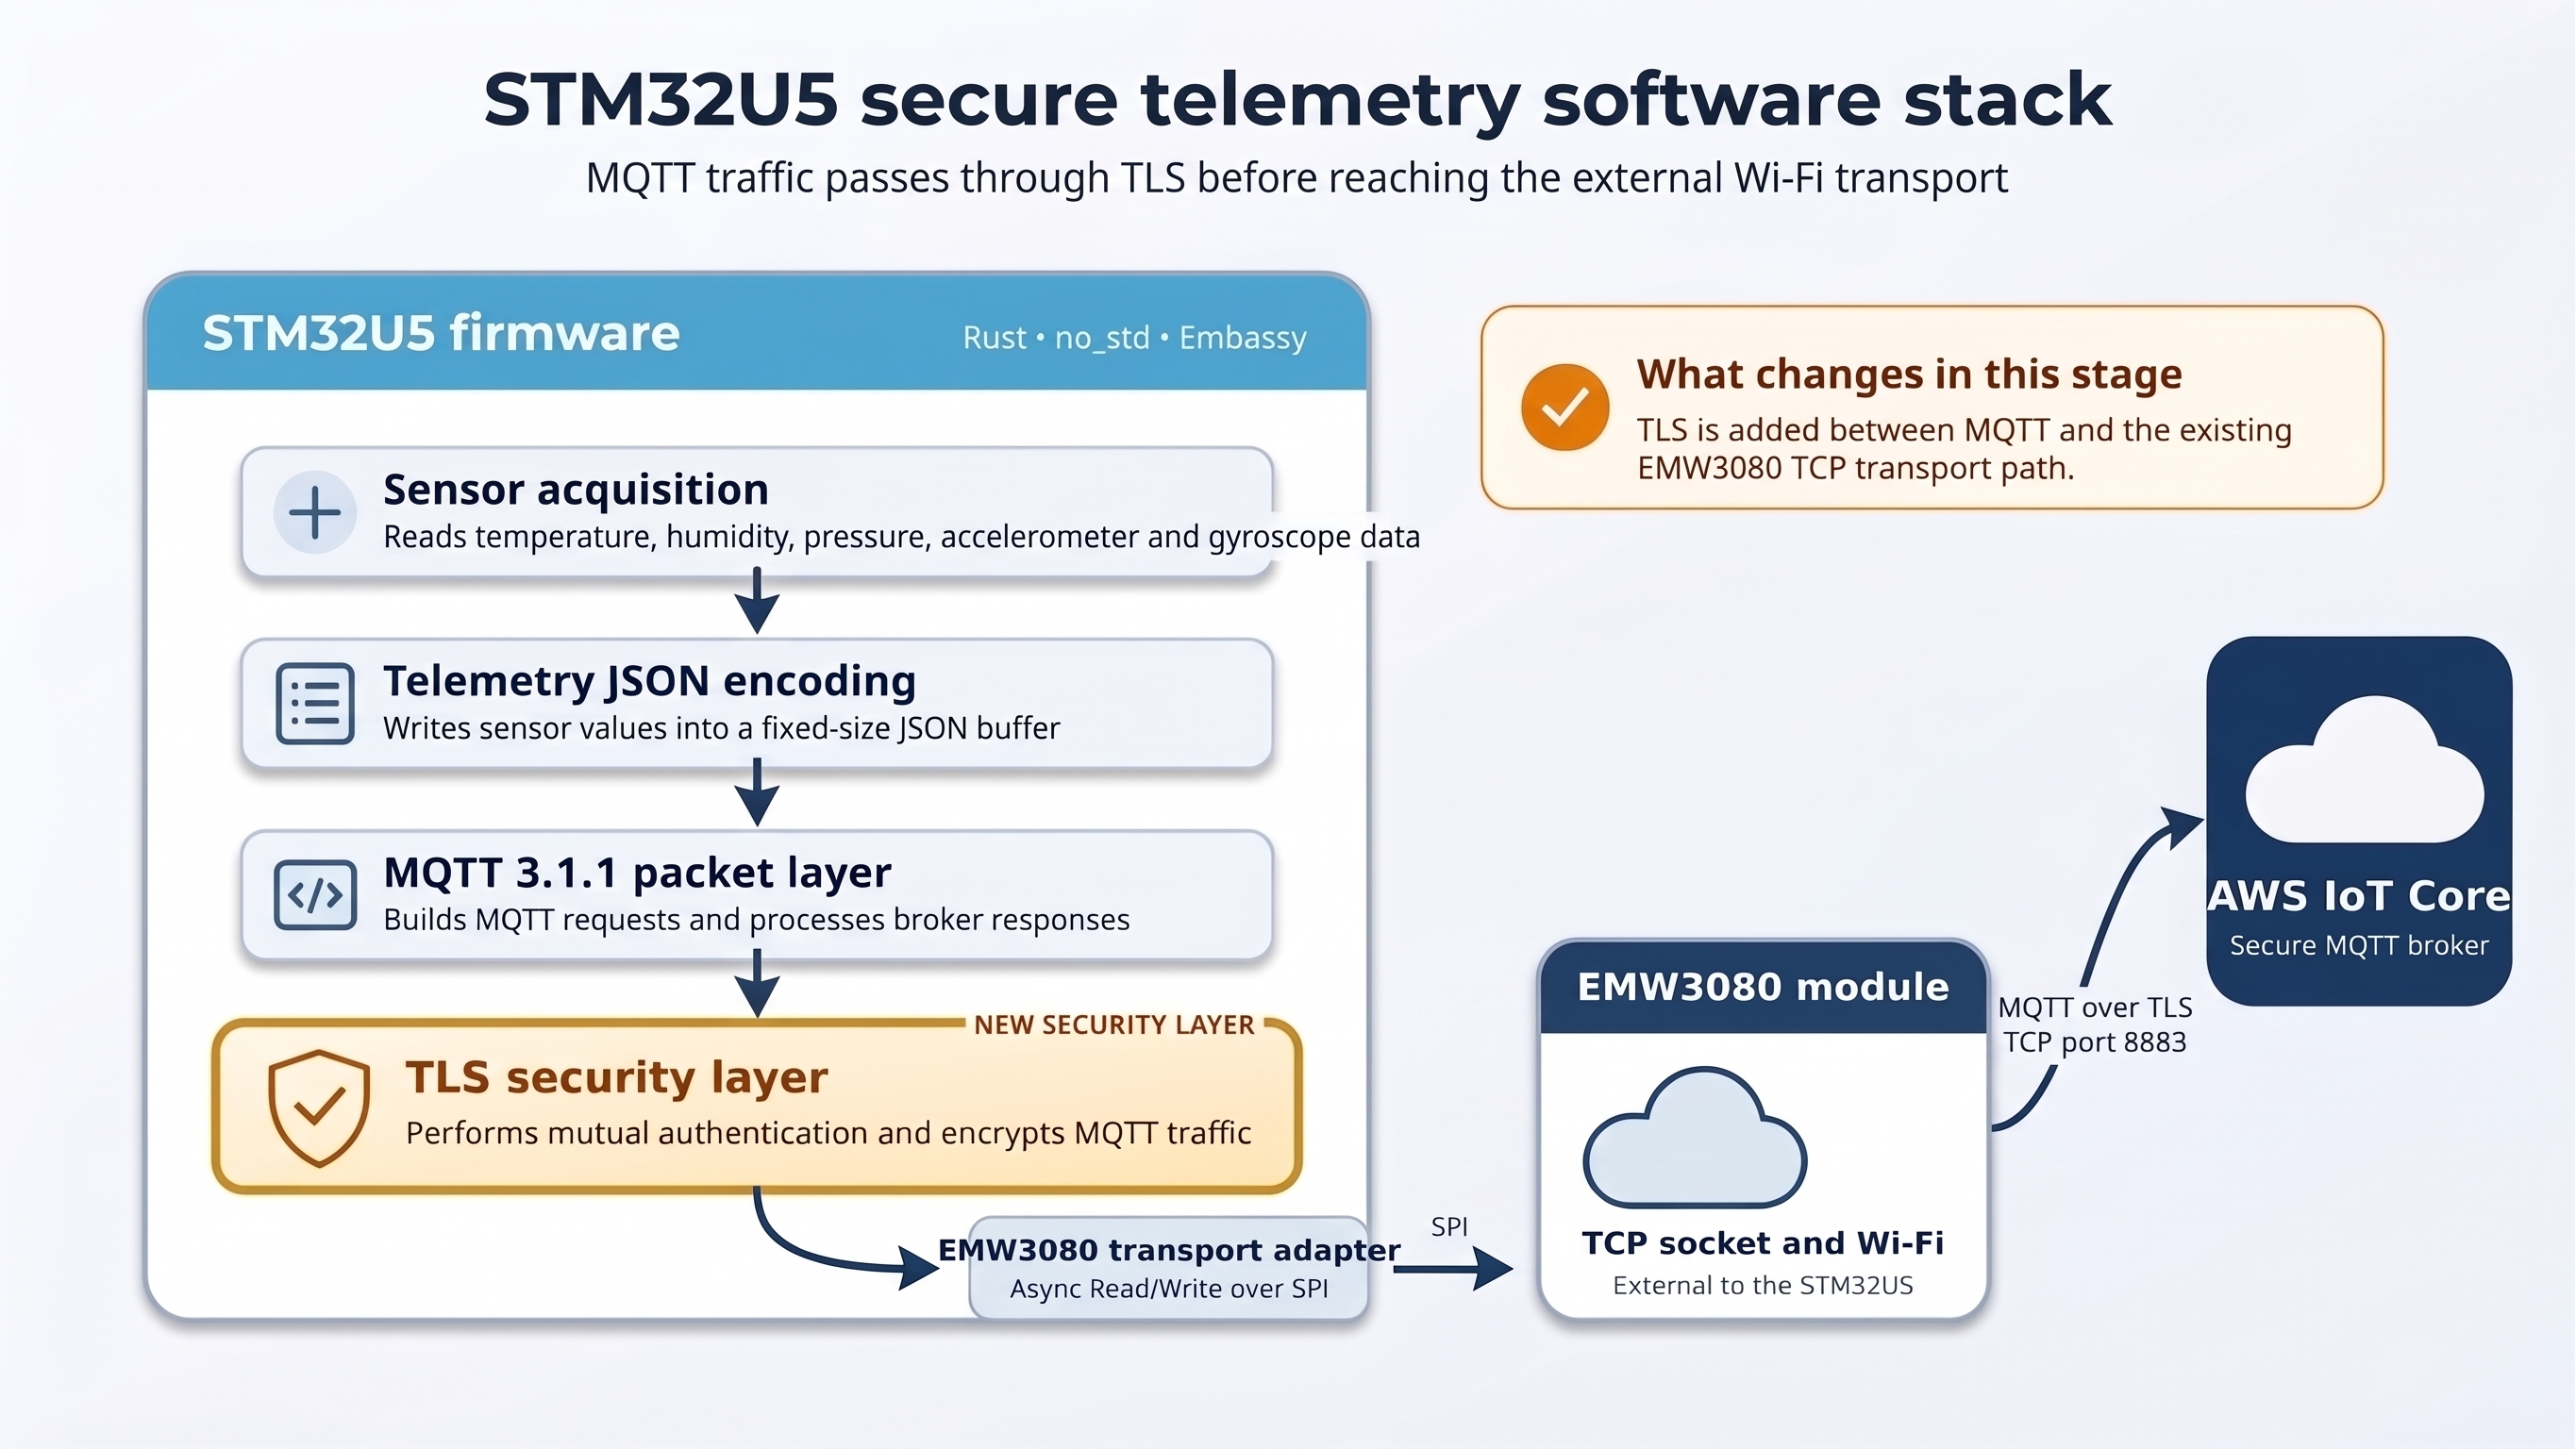
To publish sensor data securely from the STM32 to AWS IoT Core, we need to add a TLS layer between the MQTT packet layer and the existing TCP transport:

The EMW3080 handles:
- Wi‑Fi connectivity
- DNS resolution
- raw TCP socket
The STM32 Rust application will take care of the TLS processing on top of that socket.
Creating an asynchronous TCP adapter
The EMW3080 driver provides async methods to send and receive raw TCP data.
wifi.send(socket, data).awaitwifi.receive(socket, buffer).await
We selected the embedded-tls crate because it provides TLS support for no_std embedded applications and works with asynchronous transports through the embedded-io-async interfaces. This fits our Embassy-based STM32U5 firmware, where network communication is handled through the EMW3080 Wi-Fi module rather than std::net.
The underlying transport used by embedded-tls must implement the embedded_io_async::Read and embedded_io_async::Write traits.
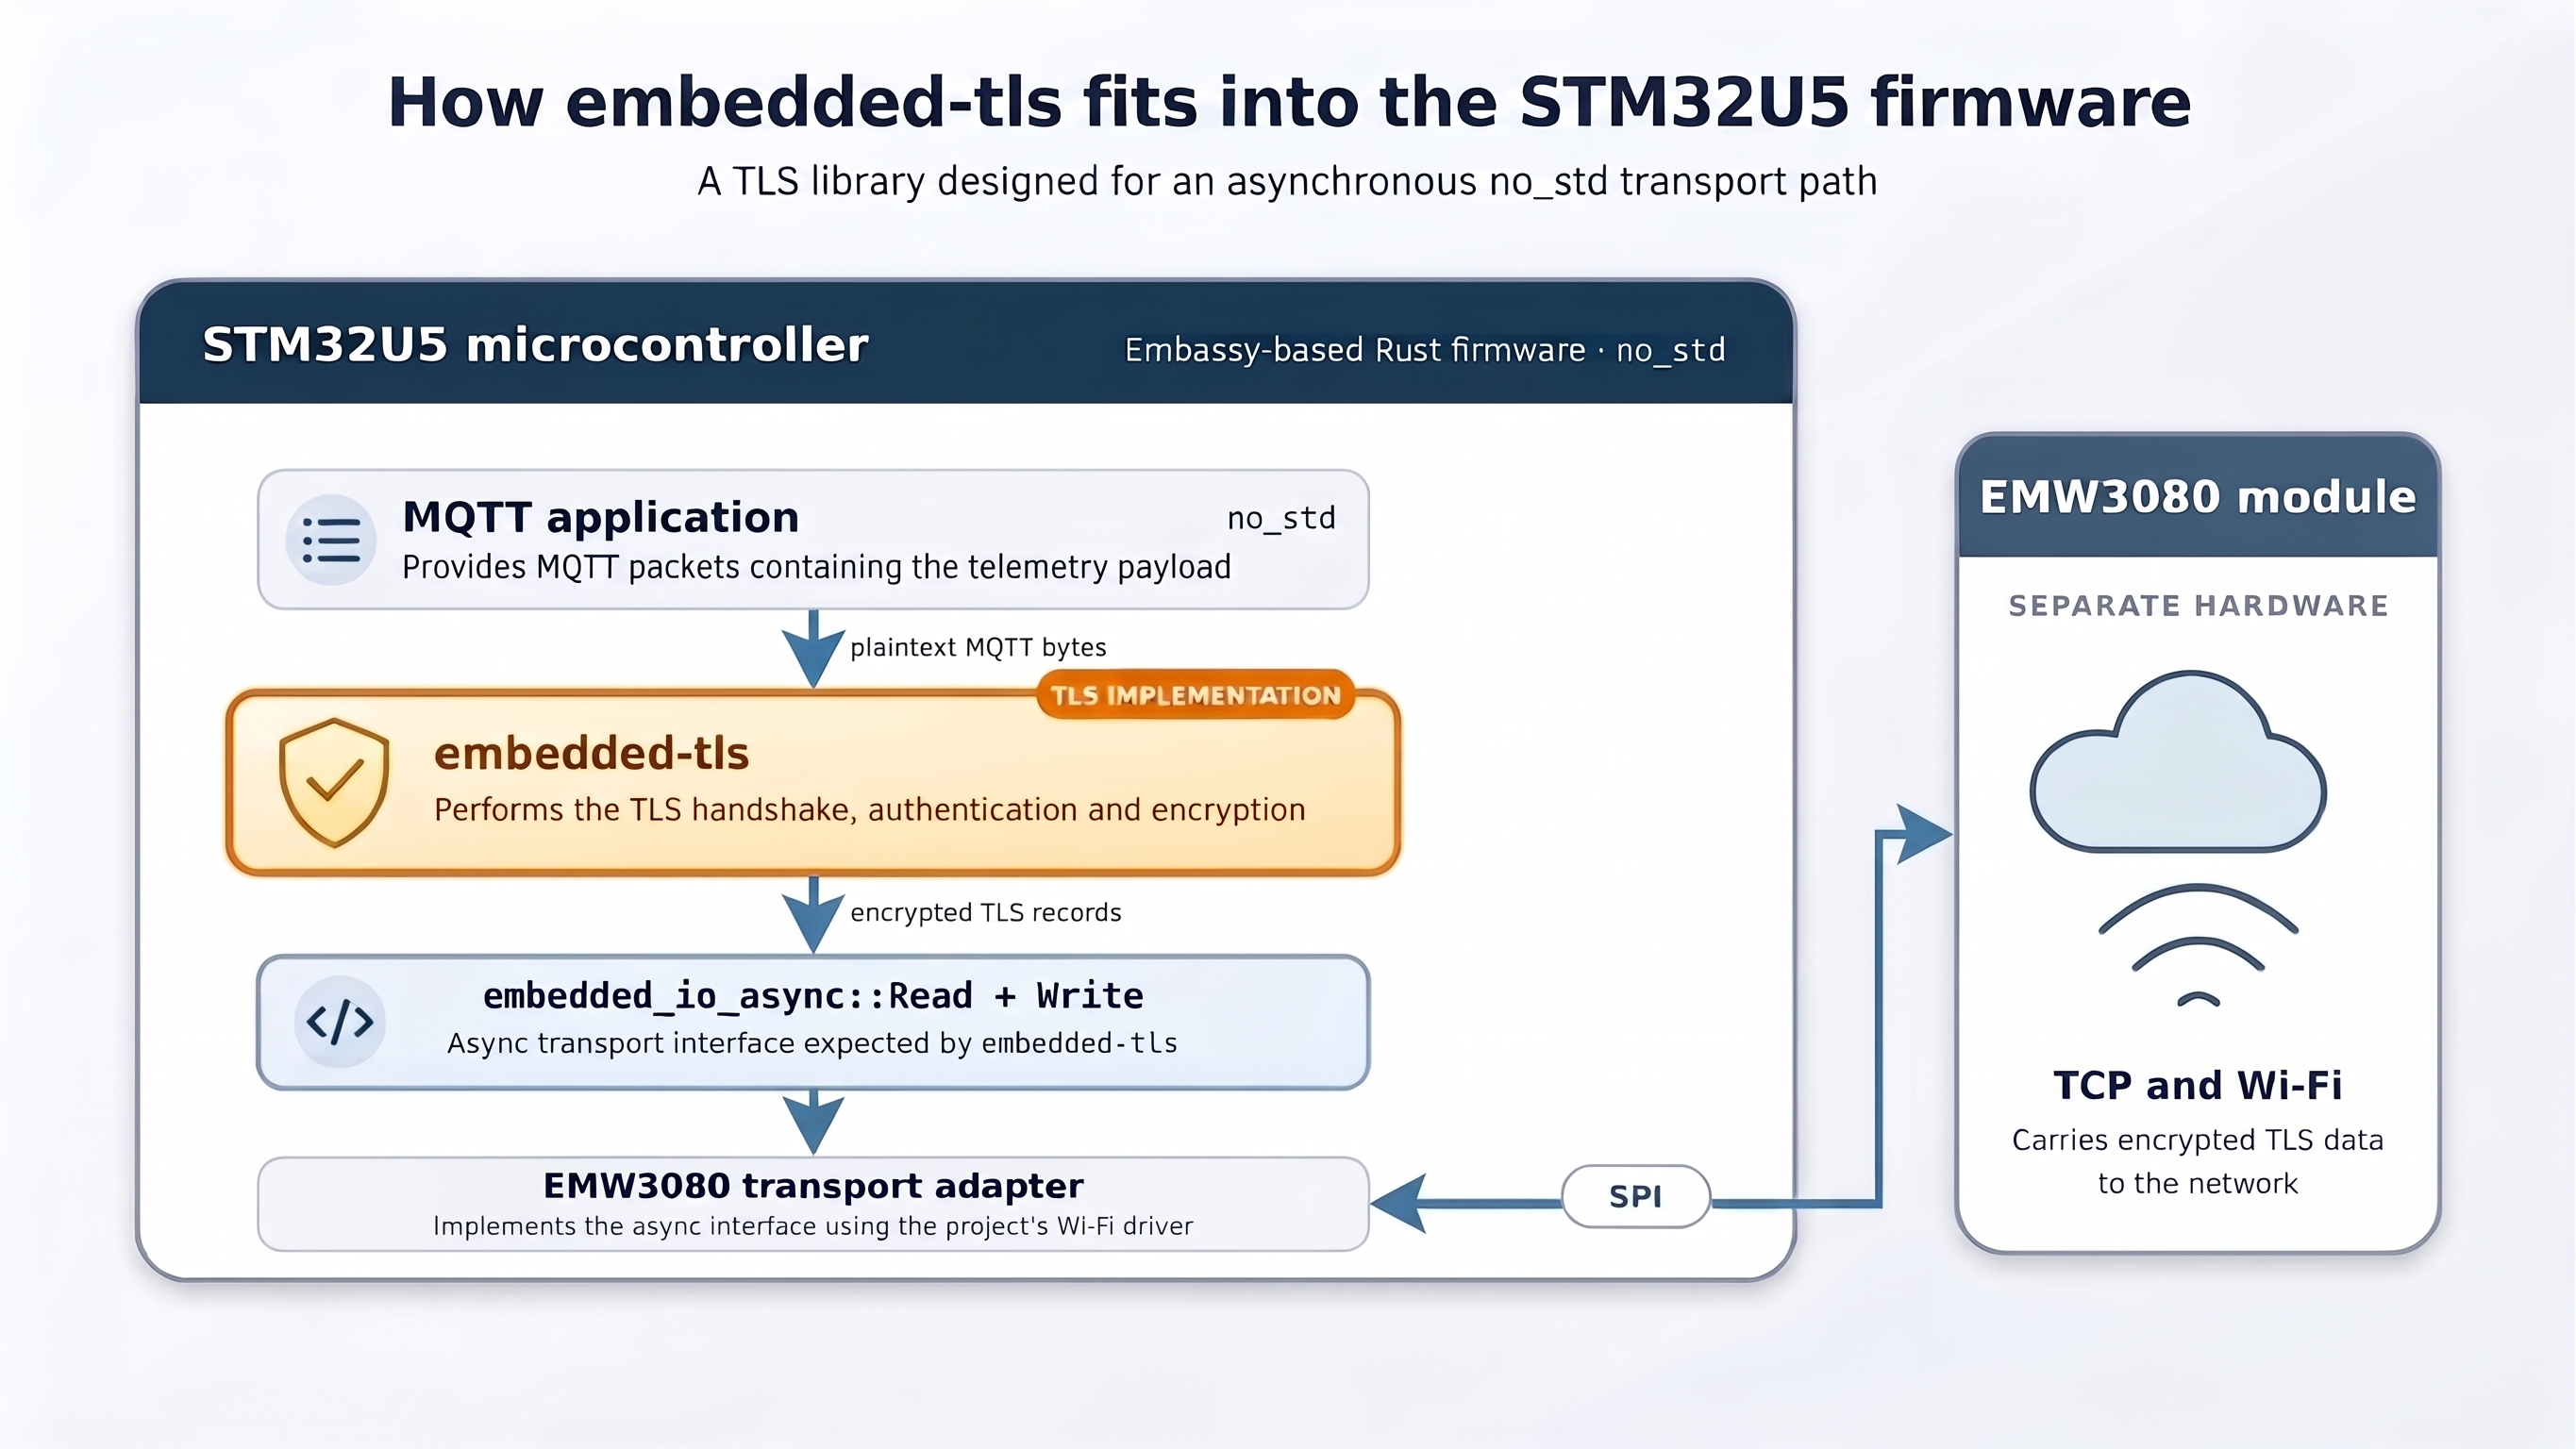
We therefore added the following dependencies to application/Cargo.toml to provide these interfaces and the cryptographic operations required by the TLS implementation:
embedded-io = { version = "0.7", default-features = false }embedded-io-async = { version = "0.7", default-features = false }
Default features were disabled because the firmware is a bare-metal no_std application.
Wifi Module Integration
There are three separate components:
- EMW3080 module firmware: Runs inside the EMW3080 module. It manages Wi-Fi and TCP socket operations.
- EMW3080 Rust driver: Runs as part of the STM32U5 application, mainly through
application/src/net/emw3080.rs. It sends commands to the module over SPI and receives the results. - TLS transport adapter: Implemented in
application/src/net/tcp_stream.rs. It connects theembedded-tlsinterfaces to the Rust driver and identifies which open EMW3080 socket should carry the TLS data.
| Component | Developed or provided by | Runs on | Role in this project |
|---|---|---|---|
| EMW3080 module firmware | Supplied by the EMW3080 module vendor. It was not developed as part of this Rust project. | EMW3080 Wi-Fi module | Manages Wi-Fi connectivity, DNS resolution, TCP sockets, and the transfer of network data. |
| EMW3080 Rust driver | Developed as part of this STM32U5 project in application/src/net/emw3080.rs. | STM32U5 application firmware | Sends commands to the EMW3080 module over SPI and receives the module’s responses and network data. |
| TLS transport adapter | Developed as part of this STM32U5 project in application/src/net/tcp_stream.rs. | STM32U5 application firmware | Implements the asynchronous Read and Write interfaces required by embedded-tls. It associates the Rust driver with the descriptor of an open EMW3080 TCP socket. |
Connecting embedded-tls to an EMW3080 TCP socket
The STM32 application asks the EMW3080 Rust driver to open a TCP connection to the AWS IoT endpoint. The driver first sends a command over SPI asking the EMW3080 module to create a socket. The module creates the socket and returns its numeric descriptor. The driver then sends a second command over SPI containing the socket descriptor, the resolved IP address of the AWS IoT endpoint, and TCP port 8883. The EMW3080 module uses the descriptor to identify the socket it created and connects that socket to AWS IoT Core. Once the connection is established, the driver returns the descriptor to the STM32 application. This descriptor identifies the TCP connection inside the EMW3080 module.
After the TCP connection has been established, the application creates the TLS transport adapter using the socket descriptor and a reference to the EMW3080 Rust driver. The adapter does not create or connect the socket. It stores the descriptor and, whenever embedded-tls asks it to read or write data, passes that descriptor to the driver. The driver uses the descriptor to send or receive data through the correct TCP connection. The transport adapter is implemented in:
application/src/net/tcp_stream.rs
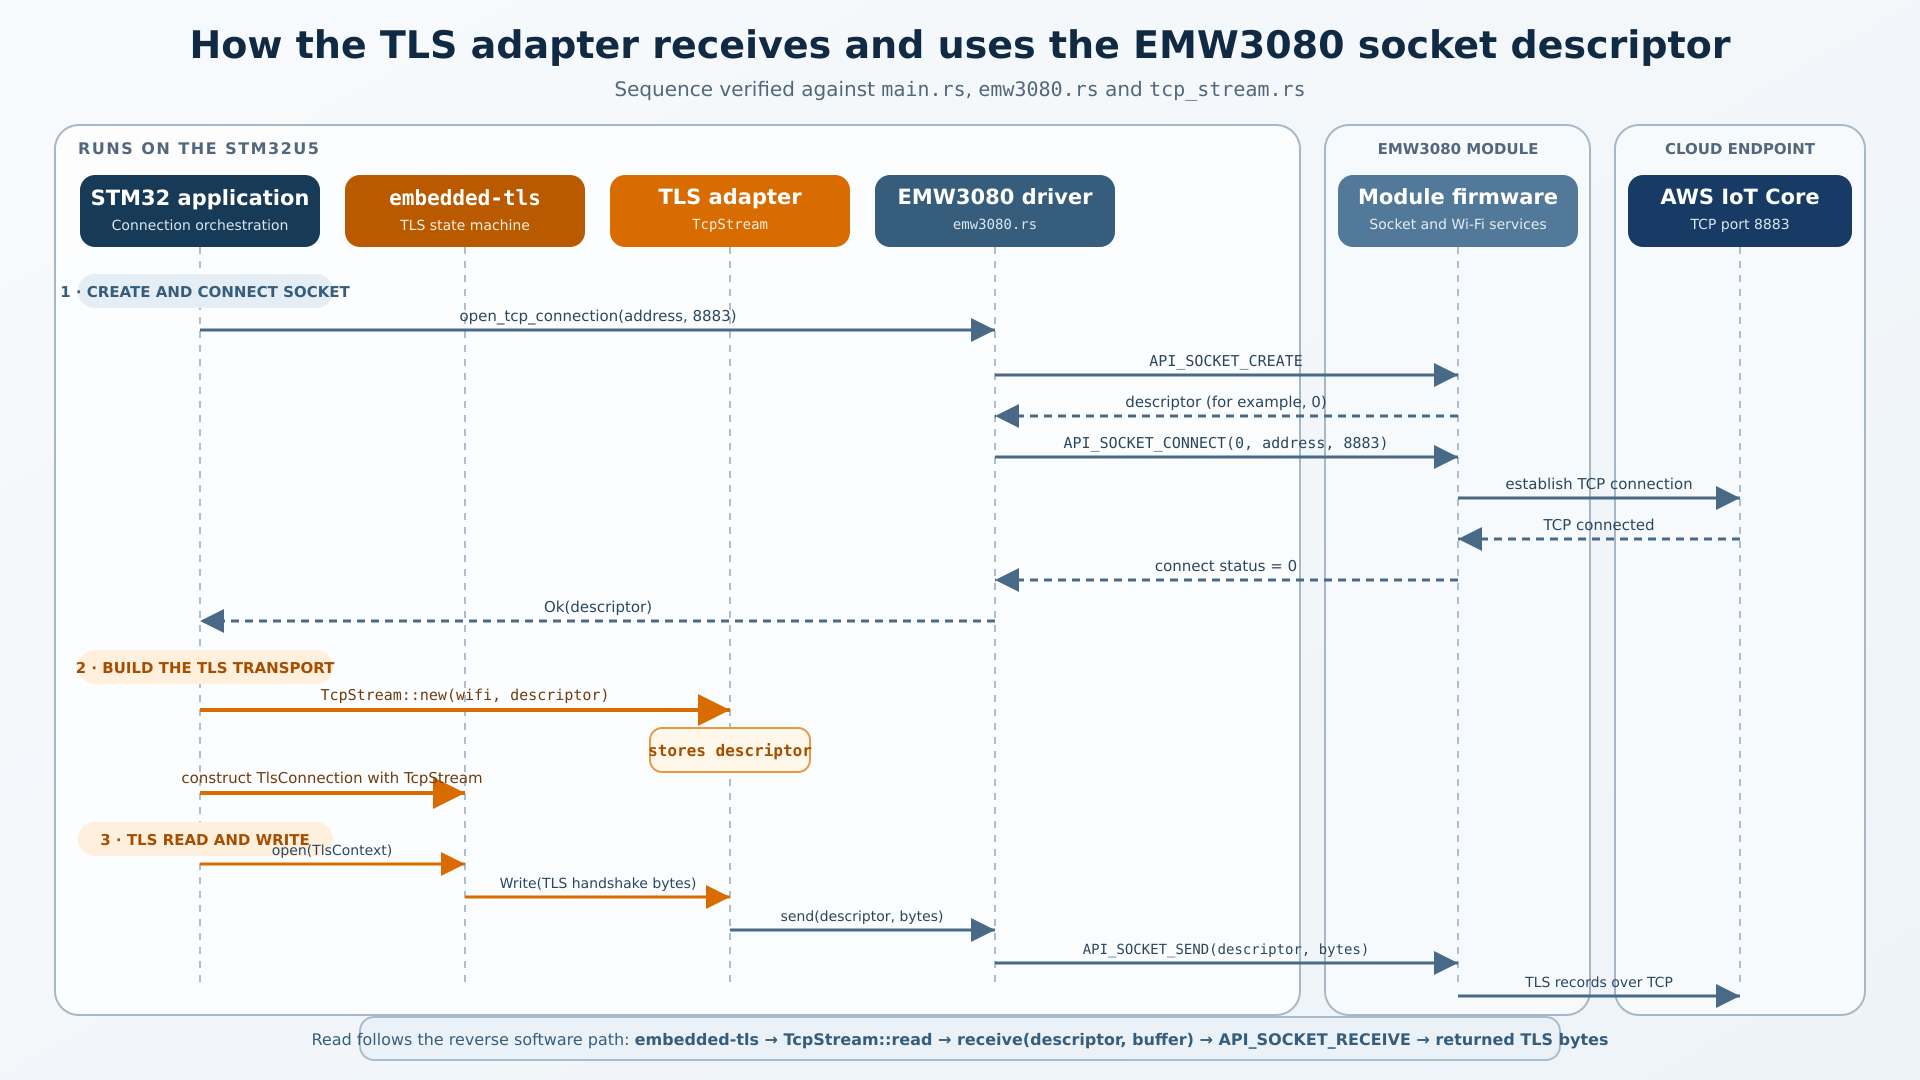
The adapter associates the EMW3080 driver with an open socket descriptor and implements the interfaces required by the TLS layer:

const MAX_CONSECUTIVE_EMPTY_READS: u32 = 30;#[derive(Debug, Clone, Copy, PartialEq, Eq)]pub enum TcpError { Transport, ReceiveTimeout,}impl core::fmt::Display for TcpError { fn fmt( &self, formatter: &mut core::fmt::Formatter<'_>, ) -> core::fmt::Result { match self { Self::Transport => { formatter.write_str("EMW3080 TCP transport error") } Self::ReceiveTimeout => { formatter.write_str("EMW3080 TCP receive timeout") } } }}impl core::error::Error for TcpError {}impl embedded_io::Error for TcpError { fn kind(&self) -> embedded_io::ErrorKind { match self { Self::Transport => embedded_io::ErrorKind::Other, Self::ReceiveTimeout => embedded_io::ErrorKind::TimedOut, } }}impl embedded_io_async::Read for TcpStream<'_, '_> { async fn read( &mut self, buffer: &mut [u8], ) -> Result<usize, Self::Error> { if buffer.is_empty() { return Ok(0); } let mut consecutive_empty_reads = 0u32; loop { let received = self .wifi .receive(self.descriptor, buffer) .await .map_err(|_| TcpError::Transport)?; if received != 0 { return Ok(received); } consecutive_empty_reads += 1; if consecutive_empty_reads >= MAX_CONSECUTIVE_EMPTY_READS { return Err(TcpError::ReceiveTimeout); } } }}
After implementing the transport, we added the module declaration to application/src/net/mod.rs so that it could be used by the rest of the application:
pub mod tcp_stream;
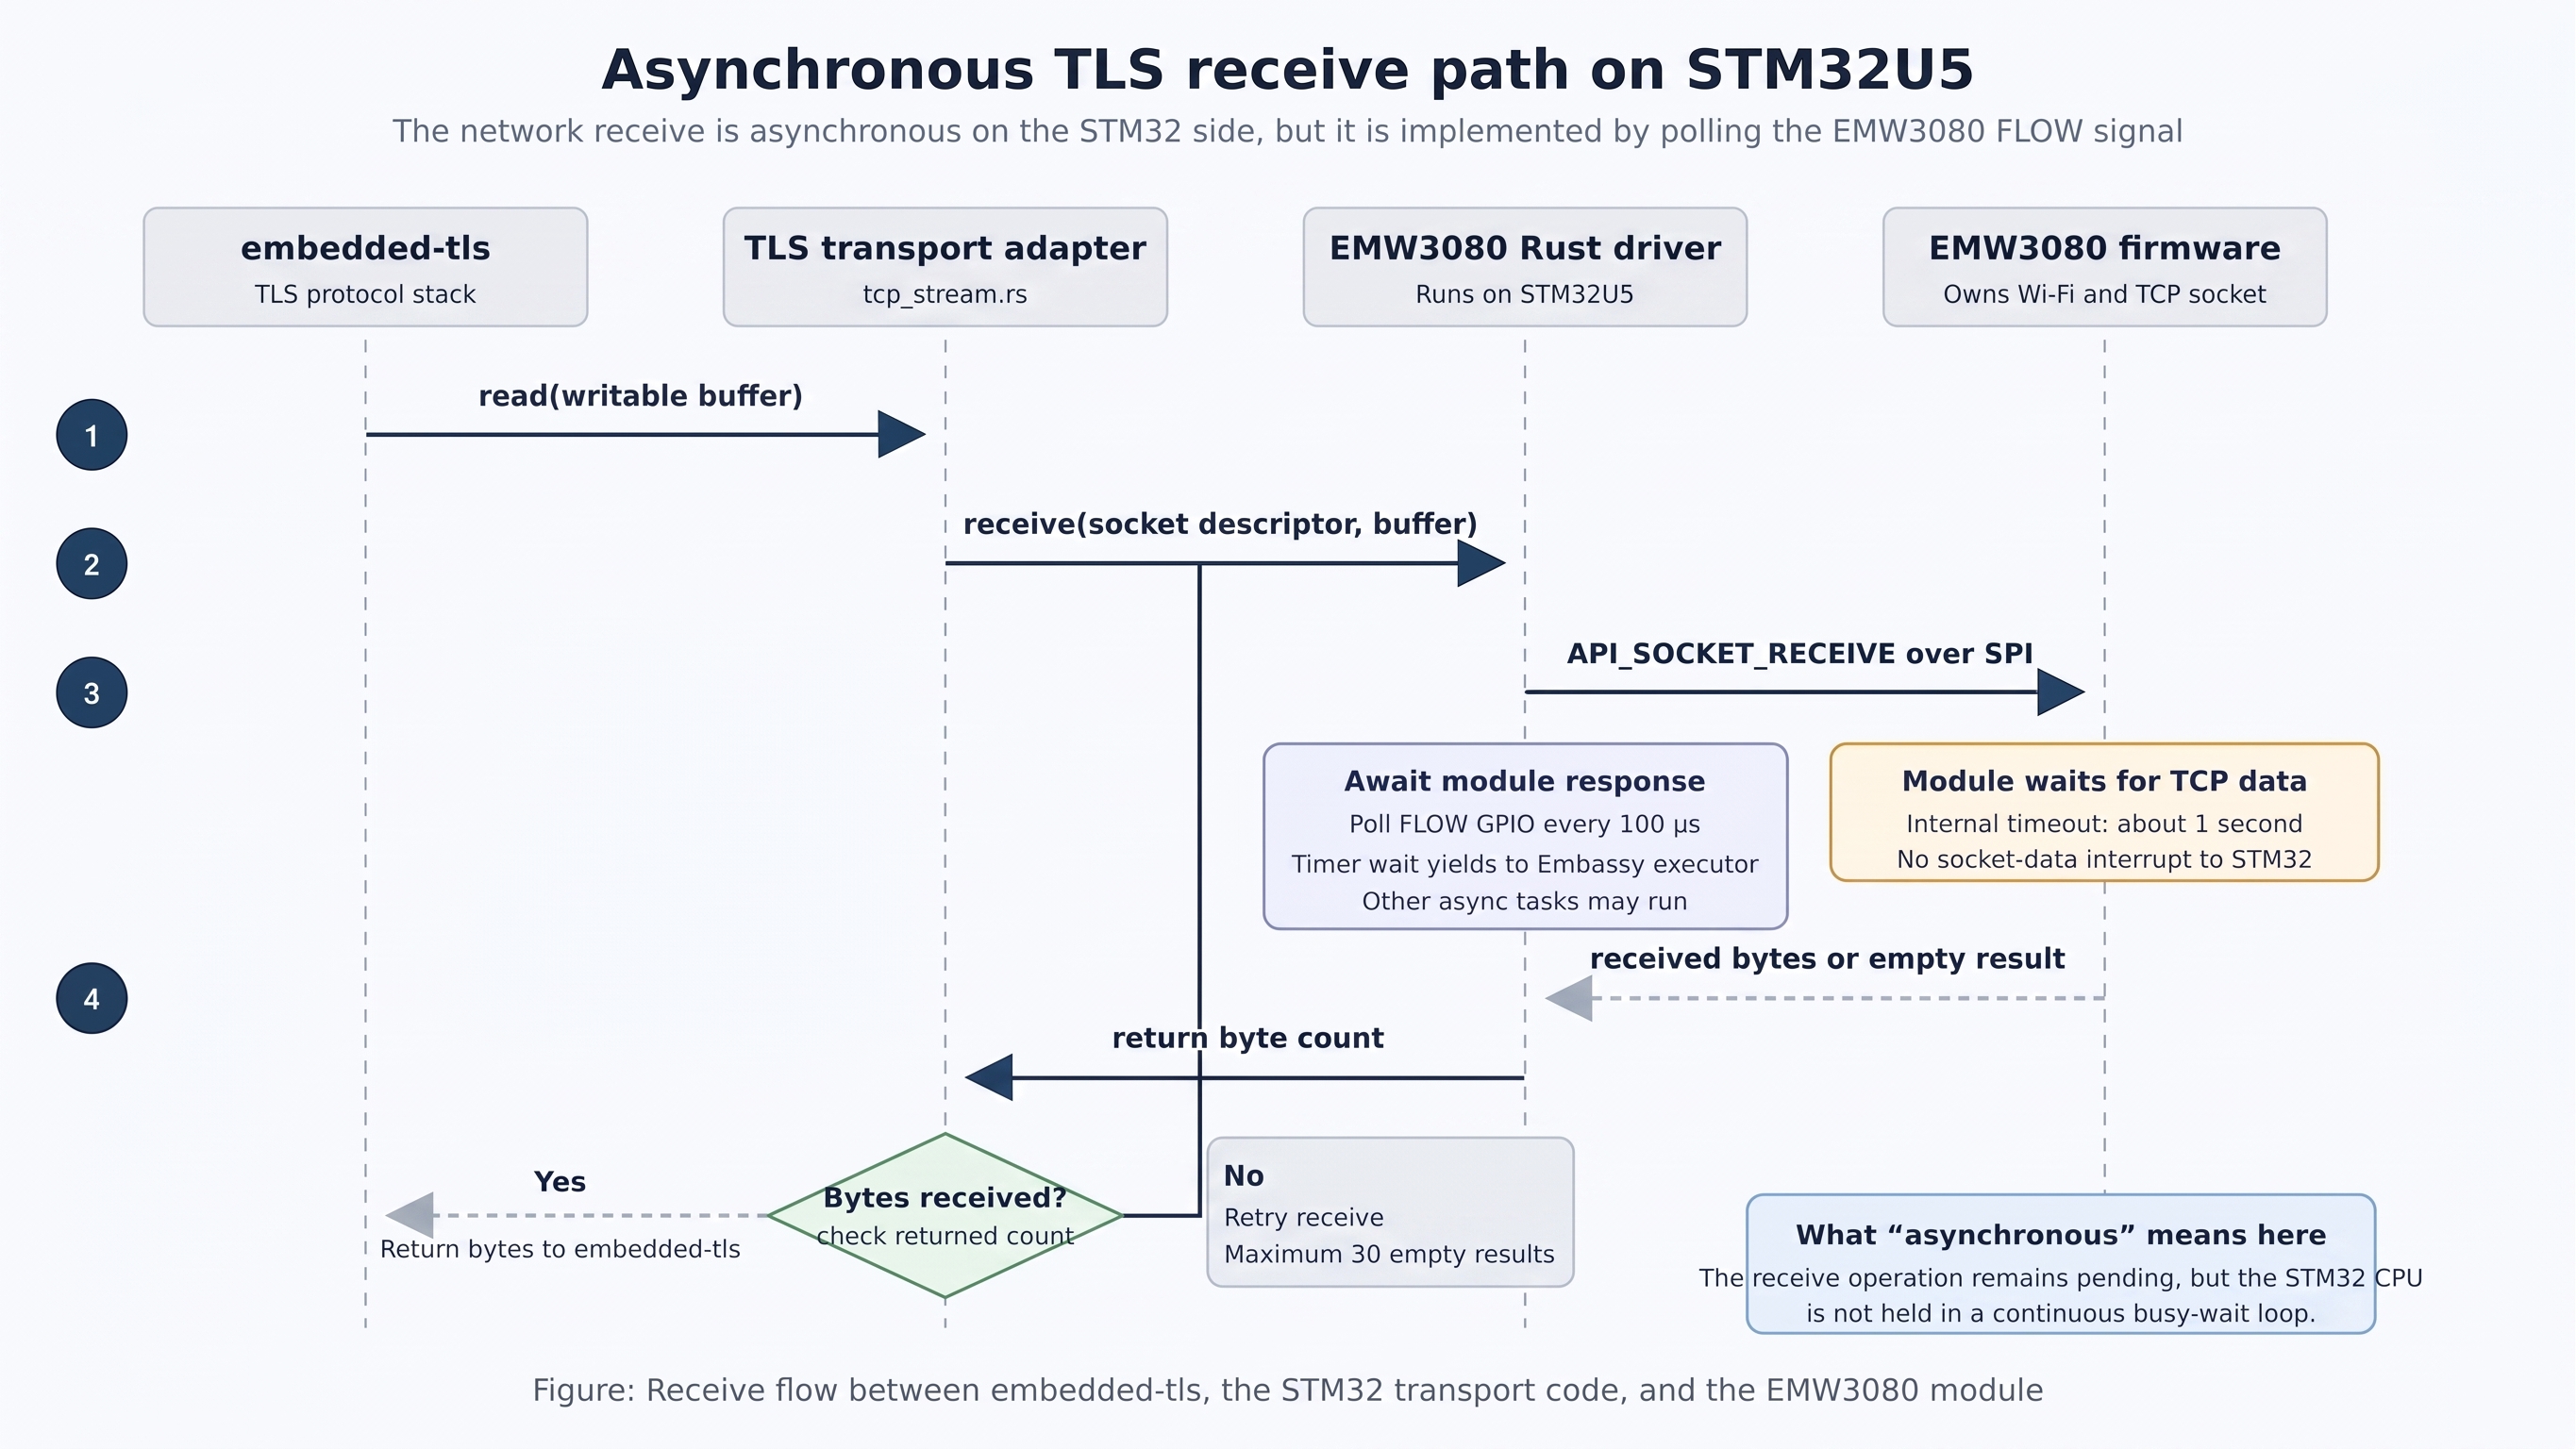
The adapter receives data through an asynchronous polling loop.
- When
embedded-tlscallsread(), the adapter sends anAPI_SOCKET_RECEIVEcommand to the EMW3080 module for the selected socket. - The receive operation may remain pending inside the EMW3080 firmware for about one second while it waits for network data.
- During this period, the STM32 task awaits the response and yields to the Embassy executor, allowing other tasks to run.
- If the module returns data, the driver copies it into the buffer supplied by
embedded-tls. - If no data arrives before the module’s internal timeout, the module reports an empty result, and the adapter issues another receive command.
- The adapter repeats this process up to 30 times before returning a receive-timeout error.
The EMW3080 receive can also return zero in the case of a timeout. The adapter waits and tries again.
Adding the TLS implementation
We enabled the certificate verification and RSA support required for the AWS IoT TLS connection in application/Cargo.toml:
embedded-tls = { version = "0.19", default-features = false, features = ["rustpki"]}
- The
rustpkifeature provides certificate-chain and hostname verification for the bare-metal application. - Client authentication is performed using an ECDSA P-256 device certificate and a project-specific cryptographic provider.
- The application does not require the
rsafeature for its client private key.
Checking the device-certificate algorithm
Mutual TLS requires the STM32 to sign part of the handshake using the private key associated with its AWS IoT device certificate. The signing algorithm supported by the TLS client must therefore match the device certificate.
The existing certificate was inspected without displaying its private key:
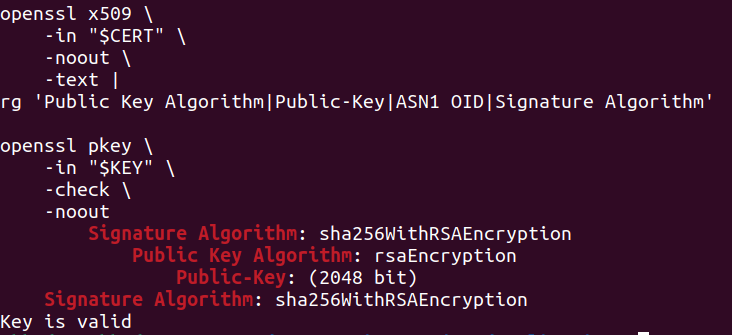
openssl x509 \ -in "$CERT" \ -noout \ -text |rg 'Public Key Algorithm|Public-Key|ASN1 OID|Signature Algorithm'openssl pkey \ -in "$KEY" \ -check \ -noout
The result was:
Signature Algorithm: sha256WithRSAEncryptionPublic Key Algorithm: rsaEncryptionPublic-Key: (2048 bit)Signature Algorithm: sha256WithRSAEncryptionKey is valid
The certificate uses a 2048-bit RSA key, and the corresponding private key is valid.
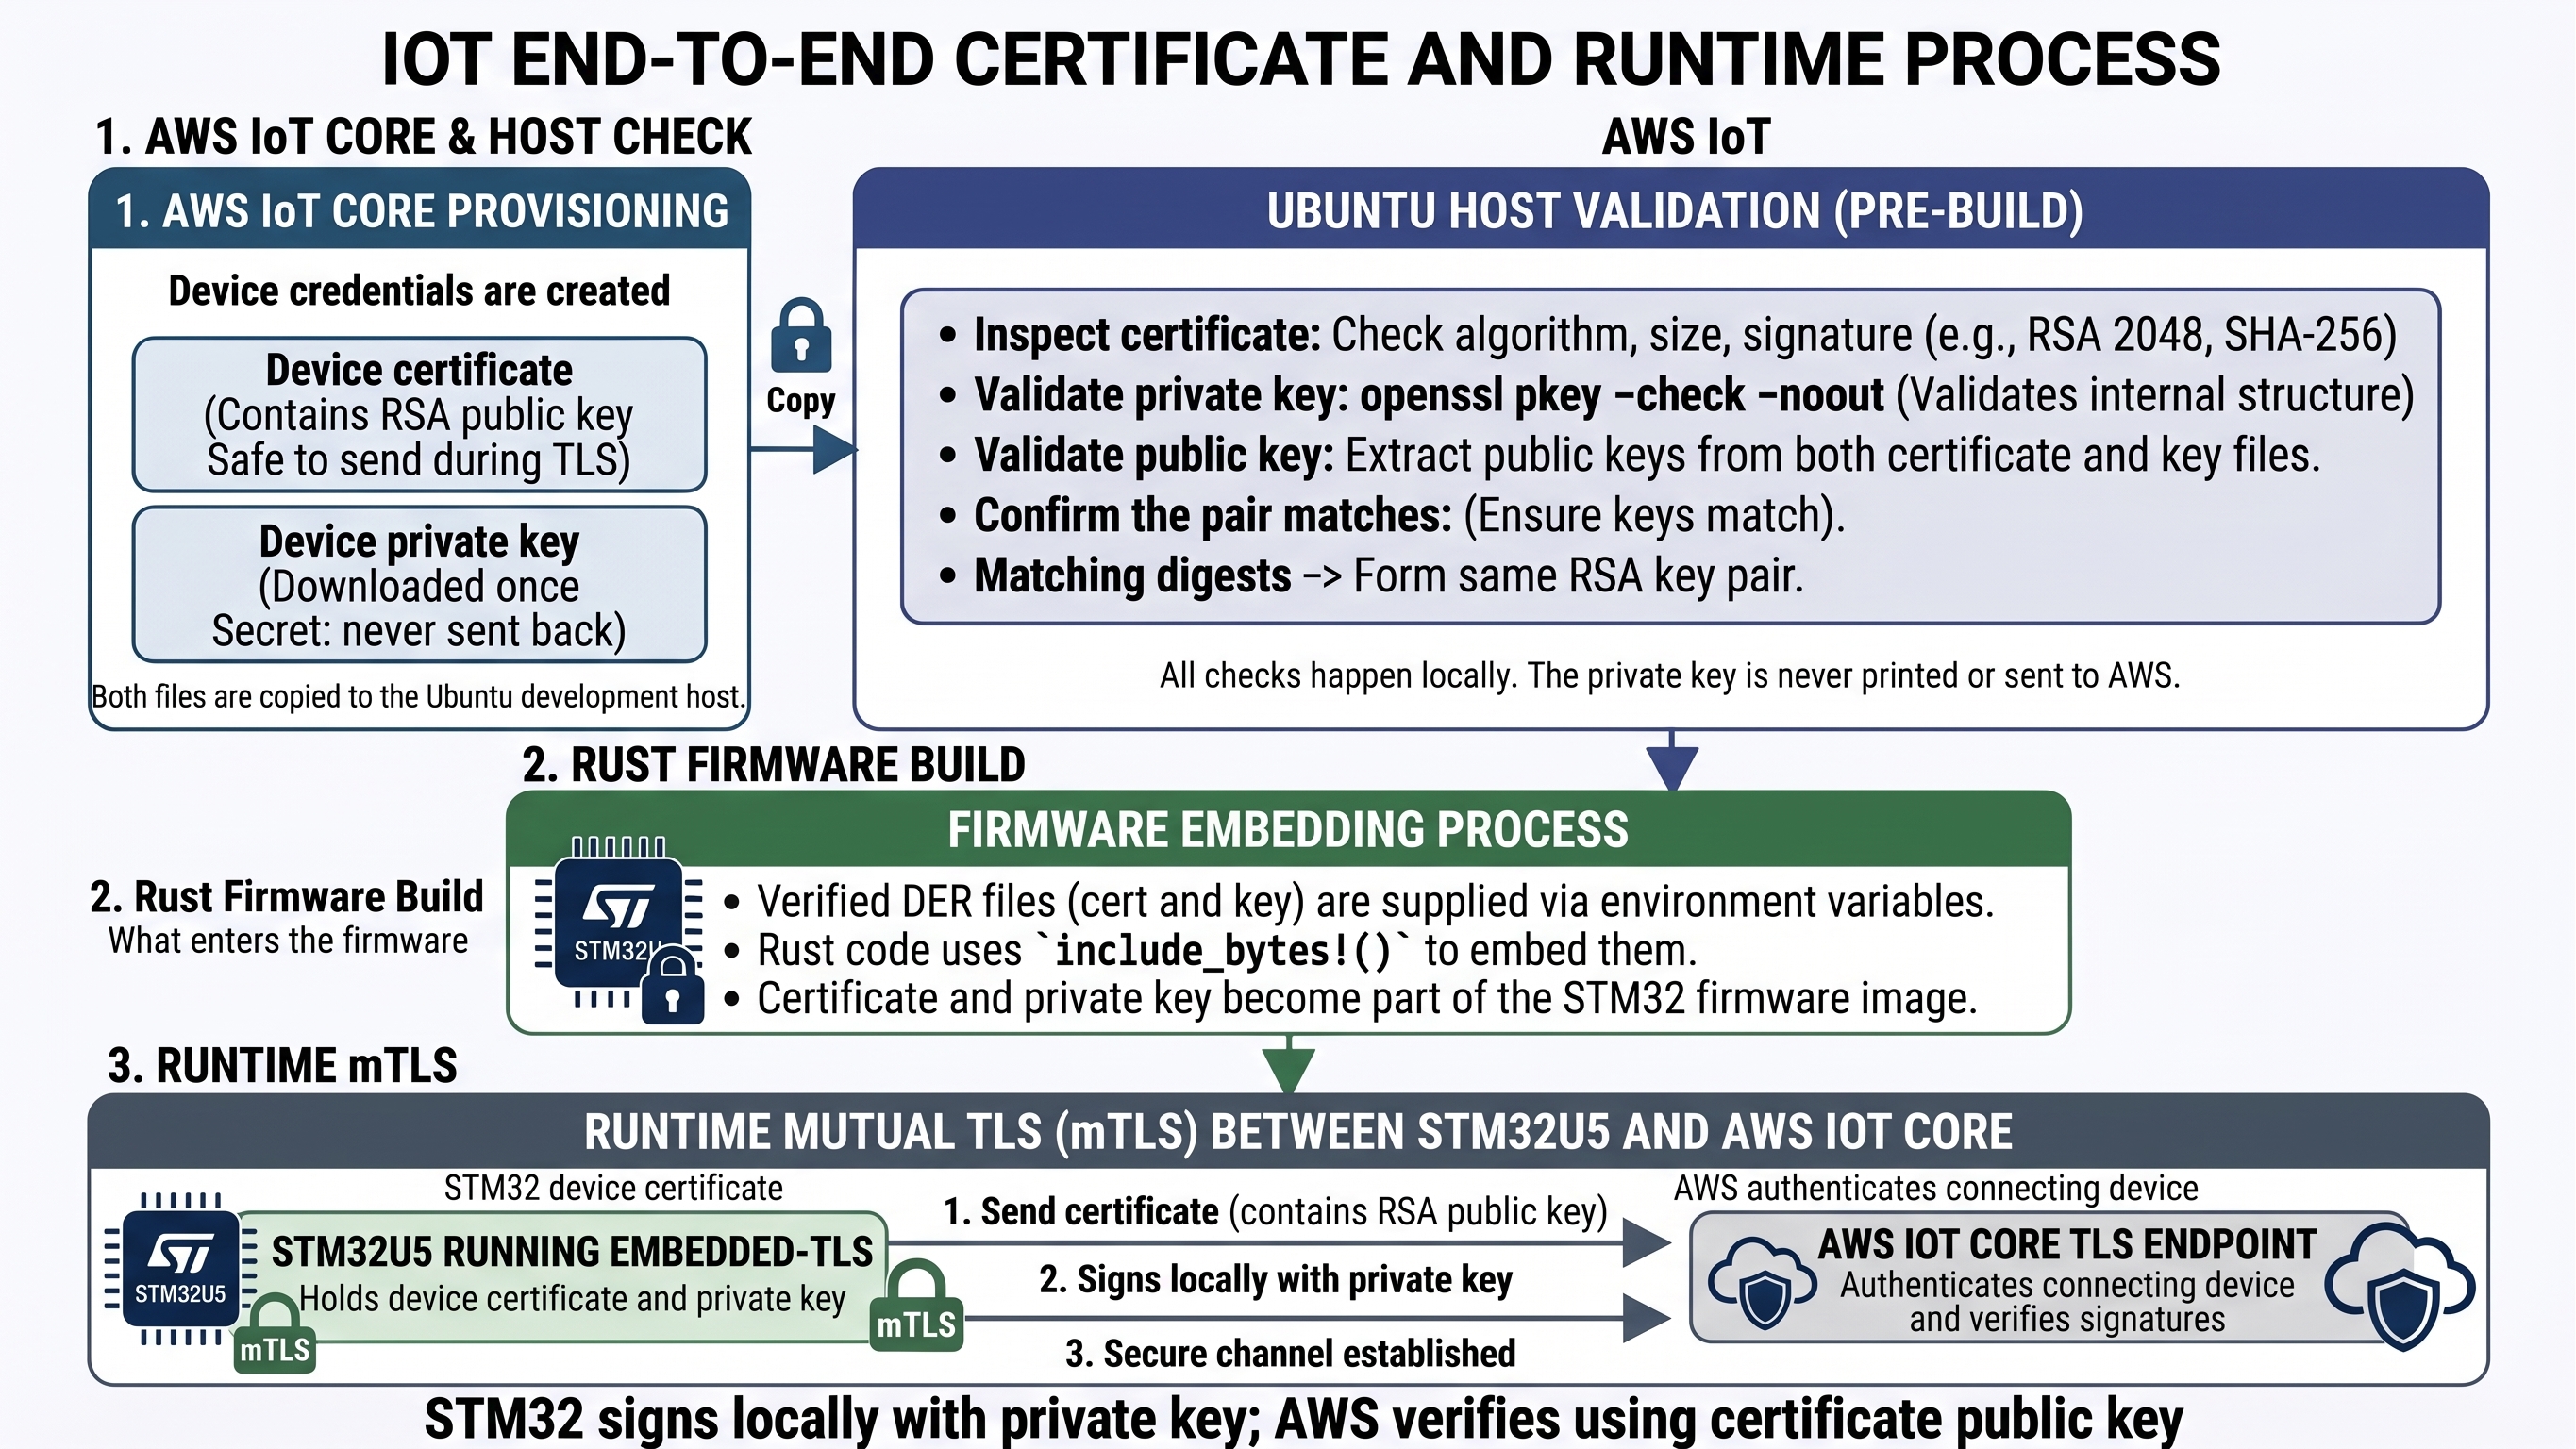
Selecting a compatible client certificate
The certificate inspection confirmed that the device certificate used during the Ubuntu test contains a 2048-bit RSA public key. mosquitto_pub used this certificate together with its RSA private key to authenticate with AWS IoT Core and publish the test message. We will therefore keep this credential pair for repeating the Ubuntu-side connection test when required.
The STM32 implementation uses the client-certificate signer built into the selected embedded-tls configuration. This signer creates an ECDSA signature using a private key on the P-256 curve. During the TLS handshake, AWS IoT Core verifies that signature using the public key contained in the device certificate. The existing certificate contains an RSA public key, so it cannot be used to verify an ECDSA P-256 signature.
The STM32 therefore needs a separate P-256 private key and a device certificate containing the corresponding P-256 public key. The RSA certificate remains assigned to the Ubuntu test client, while the P-256 certificate is used by the STM32 firmware.
Creating a P-256 device identity for the STM32U5
The certificate inspection showed that the credential already used for the Ubuntu test contains a 2048-bit RSA public key. We will continue using this certificate and its RSA private key with mosquitto_pub since they have already authenticated successfully with AWS IoT Core.
The client-certificate signer used by the STM32 embedded-tls configuration signs with ECDSA using a private key on the NIST P-256 curve. The existing RSA credential pair cannot be used by this signer, so we created a separate P-256 private key and certificate signing request for the STM32U5:
CERT_DIR="$HOME/Documents/IoT_Certs/stm32_p256"mkdir -p "$CERT_DIR"openssl ecparam \ -name prime256v1 \ -genkey \ -noout \ -out "$CERT_DIR/stm32u5-private.pem.key"openssl req \ -new \ -sha256 \ -key "$CERT_DIR/stm32u5-private.pem.key" \ -subj "/CN=stm32u5-vbhadra01" \ -out "$CERT_DIR/stm32u5-device.csr"
The generated key was checked without displaying its private contents:
openssl pkey \ -in "$CERT_DIR/stm32u5-private.pem.key" \ -check \ -nooutopenssl req \ -in "$CERT_DIR/stm32u5-device.csr" \ -noout \ -subject \ -text |rg 'Subject:|Public Key Algorithm|ASN1 OID'
The OpenSSL output confirmed that the private key was valid and used the NIST P-256 elliptic curve. We then submitted the CSR to AWS IoT Core, which issued a new device certificate containing the corresponding P-256 public key. After activating the certificate, we attached it to the existing IoT Thing and attached the existing restricted IoT policy to the certificate. The policy continued to allow access only for the configured MQTT client ID and telemetry topic:
Client ID: stm32u5-vbhadra01Topic: stm32u5/vbhadra01/telemetry
Verifying the new certificate from Ubuntu
Before embedding the certificate in the firmware, the new P-256 identity was tested from Ubuntu. The AWS IoT server connection was checked with OpenSSL:
CERT_DIR="$HOME/Documents/IoT_Certs/stm32_p256"AWS_IOT_HOST="a22qxwur84l0fk-ats.iot.eu-west-2.amazonaws.com"openssl s_client \ -connect "${AWS_IOT_HOST}:8883" \ -servername "$AWS_IOT_HOST" \ -cert "$CERT_DIR/stm32u5-device-certificate.pem.crt" \ -key "$CERT_DIR/stm32u5-private.pem.key" \ -CAfile "$HOME/Documents/IoT_Certs/AmazonRootCA3.pem" \ -sigalgs ecdsa_secp256r1_sha256 \ -tls1_3 \ -verify_return_error \ </dev/null 2>&1 |rg 'subject=|issuer=|Peer signature type|Protocol|Cipher|Verify return code'
The result was:
subject=CN = *.iot.eu-west-2.amazonaws.comissuer=C = US, O = Amazon, CN = Amazon ECDSA 256 M04Peer signature type: ECDSANew, TLSv1.3, Cipher is TLS_AES_128_GCM_SHA256Verify return code: 0 (ok)
This confirmed:
- The AWS IoT server certificate was successfully verified.
- TLS 1.3 was negotiated.
- The selected cipher suite was
TLS_AES_128_GCM_SHA256. - AWS IoT Core accepted the P-256 client identity.
Converting the credentials to DER
The embedded TLS implementation consumes DER-encoded credentials. The P-256 private key, device certificate, and Amazon root certificate were converted outside the Git repository:
openssl ec \ -in "$CERT_DIR/stm32u5-private.pem.key" \ -outform DER \ -out "$CERT_DIR/stm32u5-private-sec1.der"openssl x509 \ -in "$CERT_DIR/stm32u5-device-certificate.pem.crt" \ -outform DER \ -out "$CERT_DIR/stm32u5-device-certificate.der"openssl x509 \ -in "$HOME/Documents/IoT_Certs/AmazonRootCA3.pem" \ -outform DER \ -out "$CERT_DIR/AmazonRootCA3.der"
The credential paths are supplied to the Rust compiler through build-time environment variables:
export AWS_IOT_ROOT_CA_DER="$CERT_DIR/AmazonRootCA3.der"export AWS_IOT_CLIENT_CERTIFICATE_DER="$CERT_DIR/stm32u5-device-certificate.der"export AWS_IOT_CLIENT_PRIVATE_KEY_DER="$CERT_DIR/stm32u5-private-sec1.der"
The application includes the files in application/src/tls_credentials.rs:
/* * TLS credentials are loaded from paths supplied through build-time * environment variables. The credential files remain outside the repository. * * The private key becomes part of the generated firmware image. This is * acceptable for initial TLS bring-up, but production provisioning should * place it in protected device storage. */pub const ROOT_CA_DER: &[u8] = include_bytes!(env!("AWS_IOT_ROOT_CA_DER"));pub const CLIENT_CERTIFICATE_DER: &[u8] = include_bytes!(env!("AWS_IOT_CLIENT_CERTIFICATE_DER"));pub const CLIENT_PRIVATE_KEY_DER: &[u8] = include_bytes!(env!("AWS_IOT_CLIENT_PRIVATE_KEY_DER"));
We kept the certificate and private-key source files outside the Git repository to prevent them from being committed accidentally. During the build, however, include_bytes!() copies the private-key bytes into the generated firmware image. For a production device, the identity and private key should be provisioned into protected device storage instead of being embedded directly in the application image.
Providing cryptographic operations
The application added application/src/tls_provider.rs to supply the cryptographic operations required by embedded-tls. The provider connects the TLS implementation to:
- The STM32U5 hardware random-number generator
- ECDSA P-256 client authentication
- SHA-256 hashing
- AES-128-GCM record protection
- Server-certificate verification through the configured root CA
This keeps the firmware compatible with no_std while allowing the STM32U5 to perform the TLS handshake locally.
Performing the TLS handshake
The EMW3080 establishes Wi-Fi connectivity, resolves the AWS endpoint, and opens a TCP socket to port 8883. The socket is then wrapped in the asynchronous TcpStream adapter. The embedded TLS connection is configured with:
- The AWS IoT endpoint as the server name
- Amazon Root CA 3 as the trust anchor
- The STM32 P-256 client certificate
- The matching P-256 private key
- The STM32U5 hardware random-number generator
The hardware console reported:
a22qxwur84l0fk-ats.iot.eu-west-2.amazonaws.com resolved to 13.134.245.112TCP connection to AWS IoT establishedAWS IoT TLS handshake startingAWS IoT TLS handshake completed successfully
This verified the complete device-side path:
STM32U5 application → embedded-tls → EMW3080 TCP transport → Wi-Fi network → AWS IoT Core
A successful TLS handshake confirms server authentication, encrypted transport and acceptance of the STM32 client certificate.

Establishing the MQTT session
After completing the TLS handshake, the firmware has an encrypted and authenticated connection to AWS IoT Core, but the MQTT session has not yet been established. The firmware must now create an MQTT CONNECT packet, send it through the TLS connection, and wait for the broker to return a CONNACK response. The MQTT session is ready only after AWS IoT Core accepts the connection. The MQTT client uses:
Protocol: MQTT 3.1.1Client ID: stm32u5-vbhadra01Transport: TLS on TCP port 8883
The console reported:
AWS IoT TLS handshake completed successfullyAWS IoT MQTT session established
This confirms that AWS IoT Core accepted the MQTT client ID and the permissions associated with the device certificate.
Publishing with QoS 1
The first STM32 test published the message using QoS 0. This confirmed that the firmware could send the MQTT packet through the encrypted TLS connection, but QoS 0 does not require AWS IoT Core to return an acknowledgement. To obtain confirmation from the broker, we extended the MQTT encoder in application/src/net/mqtt.rs to support QoS 1. Each QoS 1 PUBLISH packet includes a non-zero packet identifier. When AWS IoT Core accepts the message, it returns a PUBACK containing the same identifier, allowing the firmware to match the acknowledgement to the message it sent:
PUBLISH packet identifier: 1Expected acknowledgement: PUBACK identifier 1
The STM32U5 published this fixed test payload:
{ "source": "stm32u5", "test": "aws-iot-p256-mtls", "status": "ok"}
to:
stm32u5/vbhadra01/telemetry
The console reported:
AWS IoT MQTT session establishedAWS IoT MQTT test publish sentAWS IoT MQTT PUBACK receivedAWS IoT MQTT publish transmission wait completedAWS IoT TLS handshake ready=true
Receiving PUBACK proves that AWS IoT Core accepted the QoS 1 PUBLISH packet. This is stronger evidence than merely confirming that the firmware wrote the packet to the TCP transport.

Verifying the message in AWS IoT Core
The AWS IoT MQTT test client was subscribed to:
stm32u5/vbhadra01/telemetry
A wildcard subscription using # was also used temporarily while diagnosing the original missing-message problem. After the QoS 1 implementation was added, the AWS test client displayed:
{ "source": "stm32u5", "test": "aws-iot-p256-mtls", "status": "ok"}
This provides independent end-to-end evidence that the message travelled from the STM32U5, through the embedded TLS and MQTT implementation, into AWS IoT Core.

Building and flashing the verified firmware
The application was built from the application directory:
cd ~/stm32u5_iot_project/applicationcargo build 2>&1 |tee ../build_aws_iot_qos1_publish.log
Cargo produces a valid ELF executable without a filename extension. STM32CubeProgrammer determines the input format from the extension, so the executable was copied to an .elf filename:
cp \ target/thumbv8m.main-none-eabihf/debug/stm32u5_application \ target/thumbv8m.main-none-eabihf/debug/stm32u5_application.elf
The firmware was flashed using the STM32CubeProgrammer bundled with STM32CubeIDE:
/opt/st/stm32cubeide_2.1.1/plugins/com.st.stm32cube.ide.mcu.externaltools.cubeprogrammer.linux64_2.2.400.202601091506/tools/bin/STM32_Programmer_CLI \ -c port=SWD \ -w target/thumbv8m.main-none-eabihf/debug/stm32u5_application.elf \ -v \ -rst
The programmer verified the download and reset the MCU:
Download verified successfullyMCU ResetSoftware reset is performed
Publishing live sensor telemetry
The fixed MQTT test payload confirmed that the STM32U5 could establish a mutually authenticated TLS connection, create an MQTT session and publish a QoS 1 message to AWS IoT Core. The next step was to replace the fixed payload with the JSON document generated from the board’s sensor readings. The scheduler already encoded a TelemetrySnapshot into telemetry_json once per heartbeat:
match encode_snapshot_json( &mut telemetry_json, config::DEVICE_ID, &snapshot,) { Ok(()) => { logln!( log, "telemetry_json={}", telemetry_json.as_str() ); logln!(log, "TRACE 32: telemetry encode PASS"); } Err(_) => { logln!(log, "TRACE 32: telemetry encode FAILED"); logln!(log, "Telemetry JSON buffer overflow"); }}
At this point, the JSON document was visible on the UART console but was not being sent through the verified AWS IoT TLS connection.
Identifying the missing publication path
The application still contained part of its earlier raw MQTT implementation:
let mut mqtt_socket: Option<i32> = None;
The scheduler attempted to publish only when this optional socket contained a descriptor:
if let Some(socket) = mqtt_socket { // Publish telemetry}
Because mqtt_socket was initialized to None and never assigned a connected socket, this block could not execute. Opening a raw MQTT socket was also unsuitable for AWS IoT port 8883. Messages sent to that port must travel through the authenticated TLS connection. The verified publish_aws_iot_payload() function already performed the required sequence:
- Resolve the AWS IoT endpoint.
- Open the EMW3080 TCP connection.
- Establish the TLS session.
- Send the MQTT
CONNECTpacket. - Validate the returned
CONNACK. - Encode and send a QoS 1
PUBLISH. - Read and validate the corresponding
PUBACK. - Close the TLS and TCP connection.
The scheduler therefore needed to call this function directly with the generated sensor JSON.
Restoring Wi-Fi initialization
The network state must be established before the scheduler attempts to publish. The result of the existing Wi-Fi bring-up function is retained in network_ready:
let network_ready = bring_up_wifi( &mut wifi, &mut log,).await;
The existing bring_up_wifi() function resets the EMW3080, confirms its firmware version, joins the configured wireless network and waits for a DHCP address. The hardware console confirmed successful network initialization:
TRACE 40: EMW3080 reset beginTRACE 41: EMW3080 FLOW after reset = lowEMW3080 firmware V2.3.4TRACE 43: joining Wi-Fi network BT-2PFJ6Cip=192.168.1.152 mask=255.255.255.0 gateway=192.168.1.254 dns=192.168.1.254TRACE 44: Wi-Fi bring-up PASS
The Wi-Fi SSID is shown here because it was already visible in the serial output. The Wi-Fi password is not printed or stored in the repository.
Connecting the scheduler to the AWS IoT publisher
After successful JSON encoding, the scheduler now passes the complete JSON document to publish_aws_iot_payload():
if network_ready { logln!( log, "TRACE 33: AWS IoT telemetry publish begin seq={}", heartbeat_count ); if publish_aws_iot_payload( &mut wifi, &mut tls_rng, telemetry_json.as_str(), &mut log, ) .await { logln!( log, "TRACE 34: AWS IoT telemetry publish PASS seq={}", heartbeat_count ); } else { logln!( log, "TRACE 34: AWS IoT telemetry publish FAILED seq={}", heartbeat_count ); }}
The function receives the generated JSON through its payload argument:
async fn publish_aws_iot_payload( wifi: &mut Emw3080<'_>, tls_rng: &mut Rng<'_, peripherals::RNG>, payload: &str, log: &mut SerialLogger<'_>,) -> bool
The payload is then supplied to the QoS 1 MQTT encoder:
let mqtt_publish_length = match mqtt::encode_publish_qos_1( &mut mqtt_publish_packet, config::MQTT_TOPIC, payload.as_bytes(), TEST_PACKET_IDENTIFIER, ) { Ok(length) => length, Err(error) => { logln!( log, "MQTT PUBLISH encoding failed: {:?}", error ); drop(tls_connection); let _ = wifi.close(socket).await; return false; } };
The publish buffer remains large enough for the current telemetry document:
let mut mqtt_publish_packet = [0u8; 1024];
The JSON encoder uses a separate fixed-capacity buffer:
let mut telemetry_json = JsonBuffer::<768>::new();
Both buffers are statically sized. No allocation is performed while constructing the telemetry JSON or MQTT packet.
Building the sensor-telemetry firmware
The application was rebuilt after connecting the scheduler to the TLS publisher:
cd ~/stm32u5_iot_project/applicationcargo build 2>&1 |tee ../build_aws_iot_sensor_telemetry.log
Cargo generated the firmware executable without a filename extension. The file was copied to an .elf filename for STM32CubeProgrammer:
cp \ target/thumbv8m.main-none-eabihf/debug/stm32u5_application \ target/thumbv8m.main-none-eabihf/debug/stm32u5_application.elf
The firmware was then written to the B-U585I-IOT02A board:
/opt/st/stm32cubeide_2.1.1/plugins/com.st.stm32cube.ide.mcu.externaltools.cubeprogrammer.linux64_2.2.400.202601091506/tools/bin/STM32_Programmer_CLI \ -c port=SWD \ -w target/thumbv8m.main-none-eabihf/debug/stm32u5_application.elf \ -v \ -rst
The application image continued to be programmed at:
0x08040000
This preserves the existing 256 KiB bootloader partition.
Verifying the first live sensor publication
After the board restarted, the sensors were sampled and the first telemetry document was generated:
temperature_c=33.80 humidity_percent=35.64pressure_hpa=1006.85heartbeat 0TRACE 31: telemetry encode begin seq=0telemetry_json={"device_id":"vbhadra01","seq":0,...}TRACE 32: telemetry encode PASS
The firmware then opened the AWS IoT connection and published this JSON document:
TRACE 33: AWS IoT telemetry publish begin seq=0a22qxwur84l0fk-ats.iot.eu-west-2.amazonaws.com resolved to 18.175.70.184TCP connection to AWS IoT establishedAWS IoT TLS handshake startingAWS IoT TLS handshake completed successfullyAWS IoT MQTT session establishedAWS IoT MQTT telemetry publish sentAWS IoT MQTT PUBACK receivedAWS IoT MQTT publish transmission wait completedTRACE 34: AWS IoT telemetry publish PASS seq=0
The PUBACK confirms that AWS IoT Core accepted the QoS 1 message with the matching packet identifier.

Verifying consecutive telemetry messages
The next scheduler cycle generated sequence number 1 and repeated the secure publication:
heartbeat 1TRACE 31: telemetry encode begin seq=1telemetry_json={"device_id":"vbhadra01","seq":1,...}TRACE 32: telemetry encode PASSTRACE 33: AWS IoT telemetry publish begin seq=1a22qxwur84l0fk-ats.iot.eu-west-2.amazonaws.com resolved to 18.175.70.184TCP connection to AWS IoT establishedAWS IoT TLS handshake startingAWS IoT TLS handshake completed successfullyAWS IoT MQTT session establishedAWS IoT MQTT telemetry publish sentAWS IoT MQTT PUBACK receivedAWS IoT MQTT publish transmission wait completedTRACE 34: AWS IoT telemetry publish PASS seq=1
The increasing sequence number distinguishes consecutive telemetry documents and confirms that the board is publishing newly encoded sensor readings rather than repeatedly sending the earlier fixed test message.
Viewing the sensor data in AWS IoT Core
The AWS IoT MQTT test client remained subscribed to:
stm32u5/vbhadra01/telemetry
AWS IoT Core displayed the live telemetry document received from the STM32U5:
{ "device_id": "vbhadra01", "seq": 3, "temperature_c": 33.79937, "humidity_percent": 35.643387, "pressure_hpa": 1006.84985, "accel_mg": { "x": 10.126, "y": 2.318, "z": 1011.929 }, "gyro_mdps": { "x": 341.25, "y": -253.75, "z": -210 }, "magnetometer_mgauss": null, "ambient_light_lux": null}
The received document contains:
- Device identifier
- Telemetry sequence number
- Temperature in degrees Celsius
- Relative humidity percentage
- Atmospheric pressure in hectopascals
- Three-axis acceleration in milligravity
- Three-axis angular velocity in millidegrees per second
The magnetometer and ambient-light fields remain null because those sensors have not yet been integrated into the telemetry acquisition path.
End-to-end verification result
The following path has now been verified on the physical B-U585I-IOT02A board:
Onboard sensors → STM32U5 Rust firmware → fixed-capacity JSON encoding → MQTT 3.1.1 QoS 1 PUBLISH → embedded TLS 1.3 → EMW3080 TCP and Wi-Fi transport → AWS IoT Core → AWS MQTT test client
The verification includes:
- Successful initialization of the HTS221 temperature and humidity sensor
- Successful initialization of the LPS22HH pressure sensor
- Successful initialization of the ISM330DHCX accelerometer and gyroscope
- Acquisition of live sensor measurements
- Encoding of the readings into JSON
- DNS resolution of the AWS IoT endpoint
- TCP connection to AWS IoT Core on port 8883
- TLS 1.3 server authentication
- Mutual TLS client authentication using the STM32U5 P-256 device certificate
- MQTT 3.1.1 session establishment
- QoS 1 telemetry publication
- Receipt and validation of the corresponding
PUBACK - Display of the complete sensor document in the AWS IoT MQTT test client
The serial output and AWS MQTT test client provide evidence from both ends of the connection. The UART confirms the device-side operation PUBACK. The AWS console confirms that the expected JSON document arrived on the configured topic.
Current connection behavior
The current implementation creates a new TCP, TLS, and MQTT connection for each telemetry publication. After receiving PUBACK, it waits briefly and closes the connection. This design was used to verify the complete sensor-to-AWS data path while keeping the change isolated from the existing sensor scheduler. It has several practical costs:
- A DNS lookup is performed for each message.
- A new TCP connection is opened.
- A complete TLS handshake is performed.
- The client certificate is processed again.
- A new MQTT session is established.
- The connection is closed after the publication.
The telemetry interval is therefore affected by the time required for connection establishment, TLS processing, acknowledgement handling, and the closing delay.
Next implementation step
The current firmware opens a new TLS and MQTT connection for each telemetry message. In the next firmware change, we will keep the connection open and use it for multiple publications. While the connection remains open, the firmware will need to:
- Keep the TLS connection and its buffers alive outside a single function call.
- Assign a new non-zero MQTT packet identifier to each QoS 1 publication.
- Match each received
PUBACKto the transmitted packet identifier. - Send MQTT
PINGREQpackets when no telemetry has been transmitted within the keep-alive interval. - Validate the corresponding
PINGRESP. - Detect TCP, TLS and MQTT failures.
- Close invalid sessions cleanly.
- Reconnect with a controlled delay.
- Resume telemetry publication after reconnection.
The TLS connection holds non-owning references to the TCP adapter, TLS buffers, and cryptographic provider. These objects must remain valid for as long as the connection is in use. Their ownership and lifetimes must therefore be resolved before the connection can be kept inside the long-running scheduler.
Stay tuned for the next post on the next part of this project!
Discover more from Tech For Talk
Subscribe to get the latest posts sent to your email.
1 Comment