In this blog, we’ll build a simple distributed file service on AWS. The setup will have two file servers — Server 1 and Server 2. The client will always send its requests to Server 1. Behind the scenes, Server 1 treats Server 2 as a backup. Whenever the client asks for a file, Server 1 will also reach out to Server 2.
To keep things straightforward, we won’t bother with complex decision-making logic. Instead, Server 1 will always query Server 2 for the requested file. If both servers have the same version of the file, Server 1 just returns a single copy to the client. But if the files differ, Server 1 forwards both versions so the client can see the mismatch. The following diagram shows the flow of file between the client and the two server nodes.
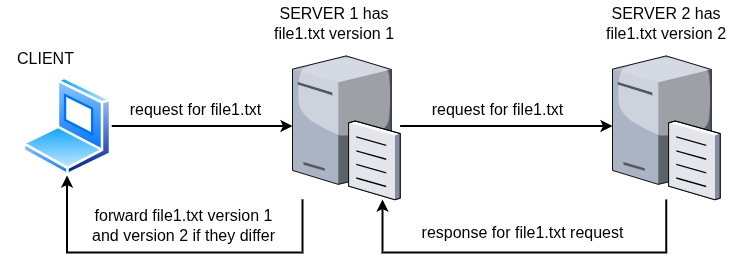
Figure 1: Distributed File Service Architecture
We’ll also test different scenarios by manually editing the files on each server. For example, we might have the same content. There could be different versions. There might even be cases where a file is missing on one server. This approach allows us to clearly show system behavior. We avoid making things too complex with full automation. That’s not the goal here.
To get started, we first need to set up the environment on AWS. For this, you’ll need an AWS account. Creating an account is outside the scope of this blog, so I’ll assume you already have one. If not, go ahead and create it before moving on. Once your account is ready, you can follow the steps below to set up the servers and prepare the environment.
Create the AWS infrastructure
We will begin by creating an AWS Key Pair. This is required to securely connect to the EC2 instances that we will launch later.
Create Key pair
Go to the AWS dashboard and serch for the AWS key pair:

Click on Key Pair and it will take you to the Key Pairs creation page. Click on the Create Key Pair on the right hand top corner of the page:

Name the key pair as MyFileSystemKeyPair (or another name of your choice).
Leave the remaining fields at their default values and click Create key pair.
This will download a file named MyFileSystemKeyPair.pem to your local machine (by default, it will be saved in ~/Downloads on Ubuntu Desktop). Keep this file safe — it will be required later when connecting to your EC2 instances.
Create a new Security Group (SG)
Now, next job is to create a new security group for our purposes. To create a new security group, go to the search pane in the AWS page and type in Security Groups. On the Security Group page click on the Create security group button.

Name the new security group as something like: MyFileServerSecurityGroup. Add a description as “Security group for distributed file server demo.” We need to add a few inbound rules for the security group. This security group will be shared by Server 1, Server 2, and the Client. We need to consider the requirements of all three instances.
We need to open the SSH port on all three instances. This will allow the instances to be connected to over SSH from your laptop. We also need to create a TCP connection on port 5001 for Server 1. Additionally, we need to create a TCP connection on port 5002 for Server 2. This will allow the servers to communicate over TCP on these ports.
For this purpose, security is not the prime concern. The focus is on enabling distributed communication between the client and the distributed servers. Hence, to keep things simple, we are not applying tight security rules. Set the Source to Anywhere, as shown in the following diagram.

Create the security group. Once the group is created, it should look somewhat like the example shown below:

Launch EC2 instances
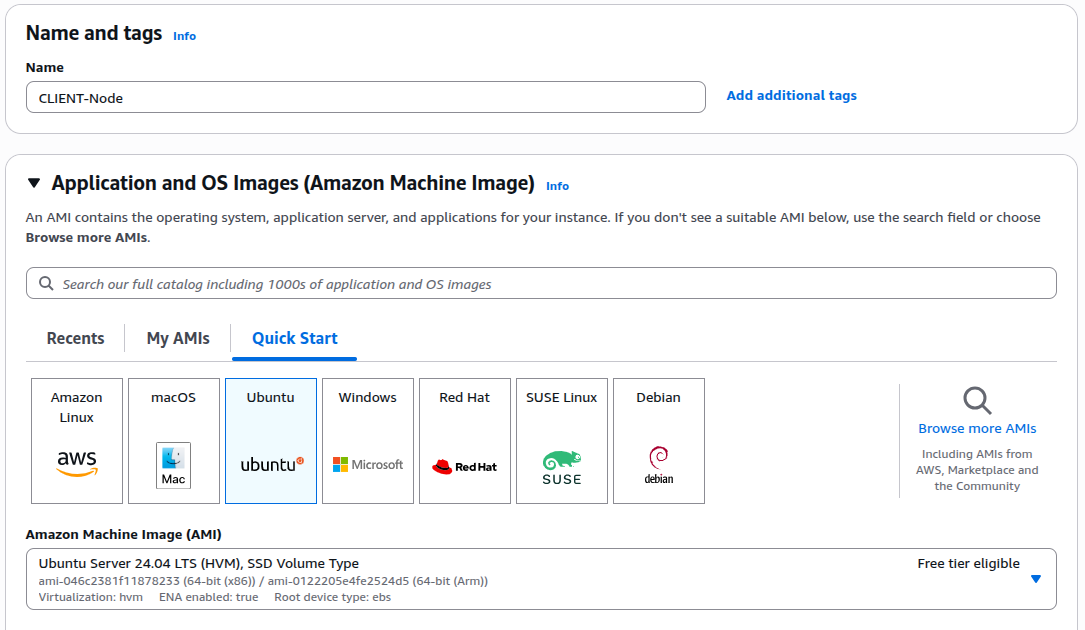
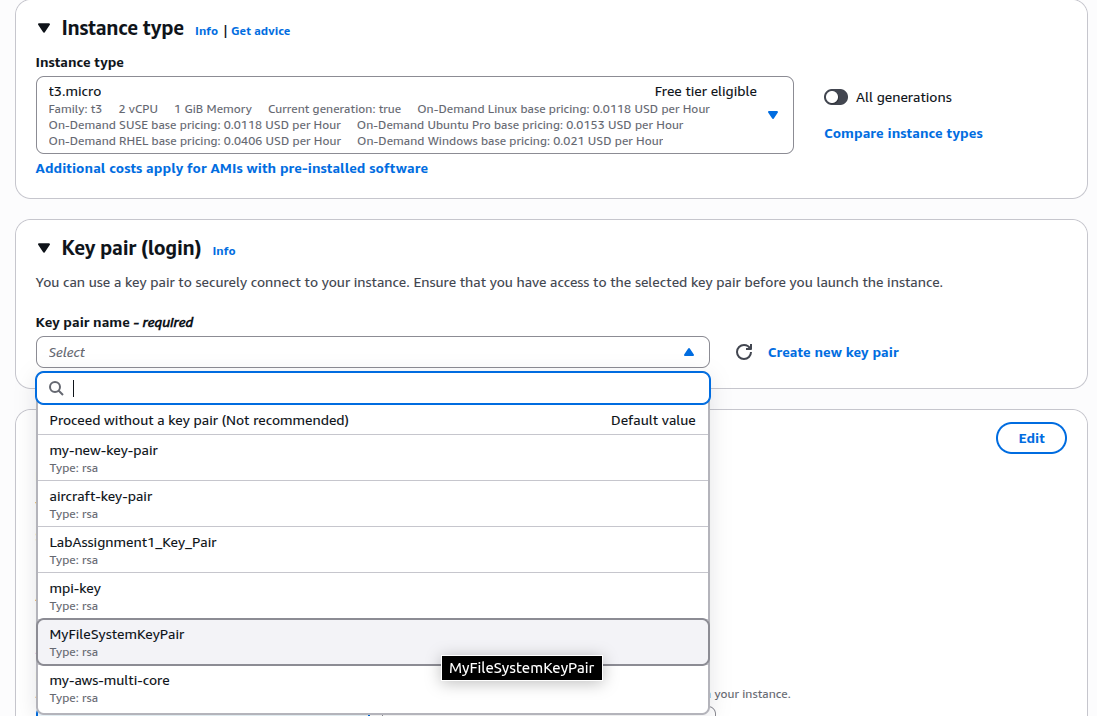
We will need at least three EC2 instances—one for the client and one for each of the two servers. Let’s create three identical EC2 instances with the following details:
Name(s): CLIENT-Node, SERVER1, SERVER2
Security Group: MyFaileServerSecurityGroup
Key Pair: MyFileSystemKeyPair
AWS ASI Type: Ubuntu 22.04 t3.micro or t2.micro
The following are step-by-step snapshots of a typical EC2 launch process:

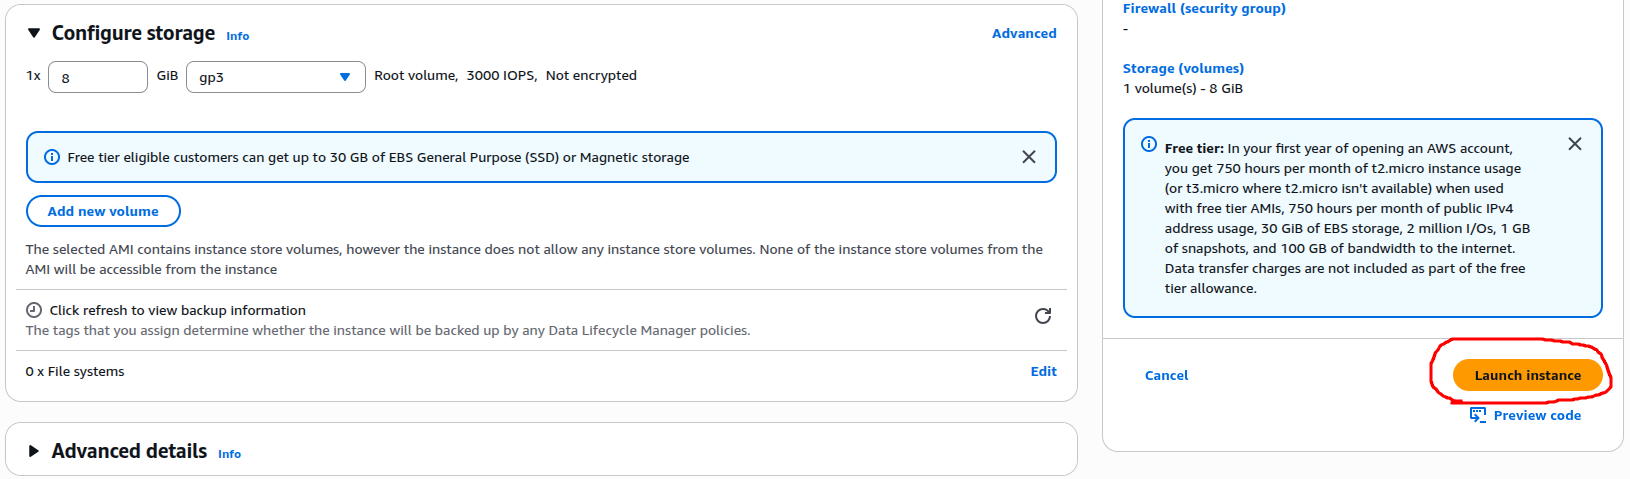
Finally, click the Launch Instance button to create the EC2 instance. Repeat the same process for each of the three EC2 instances we need to create. Once all the instances are created, go to the EC2 page. You should be able to see all three instances running.


Go to each EC2 instance and note down both the Private IP and the Public IP. These addresses will be required later when we write the scripts to establish communication between the client and the servers. In my case, the following are the Private and Public IPs of each instance:
CLINET-Node:
Public IPv4 address: 18.130.101.24
Private IPv4 addresses: 172.31.24.111

SERVER1:
Public IPv4 address: 18.171.162.167
Private IPv4 addresses: 172.31.16.124

SERVER2:
Public IPv4 address: 18.130.207.66
Private IPv4 addresses: 172.31.26.202
Now that all our necessary nodes (EC2 instances) are up and running, we need to customize each one. This setup will prepare the servers to provide file services and configure the client to send requests.
Connect via SSH and Install Required Tools
First, we need to change the file permissions of the key pair file (downloaded in one of the previous steps) by running the following command:
vbhadra@vbhadra-DQ77MK:~$ chmod 400 ~/Downloads/LabAssignment1_Key_Pair.pem
This sets the file’s permission to read-only for the owner and no permissions for group or others. This step is necessary because it restricts the key file’s permissions so that SSH accepts it. Otherwise, AWS will refuse the connection for security reasons.
Use the following command format to connect to the EC2 instances:
vbhadra@vbhadra-DQ77MK:~$ ssh -i ~/Downloads/LabAssignment1_Key_Pair.pem ubuntu@<EC2 Public IPv4 Addr>
For the CLIENT-Node instance, log in using SSH and then update the Ubuntu packages as shown below (replace the IP with your instance’s public IP):
~$ ssh -i ~/Downloads/LabAssignment1_Key_Pair.pem ubuntu@18.130.101.24
ubuntu@ip-172-31-24-111:~$ sudo apt update
ubuntu@ip-172-31-24-111:~$ sudo apt install netcat-openbsd -y
ubuntu@ip-172-31-24-111:~$ which nc
/usr/bin/nc
For the SERVER1 instance:
~$ ssh -i ~/Downloads/LabAssignment1_Key_Pair.pem ubuntu@18.171.162.167
~$ sudo apt update
~$ sudo apt install netcat-openbsd -y
~$ which nc
/usr/bin/nc
For the SERVER2 instance:
~$ ssh -i ~/Downloads/LabAssignment1_Key_Pair.pem ubuntu@18.130.207.66
ubuntu@ip-172-31-24-111:~$ sudo apt update
ubuntu@ip-172-31-24-111:~$ sudo apt install netcat-openbsd -y
ubuntu@ip-172-31-24-111:~$ which nc
/usr/bin/nc
Now, all three instances are configured and ready for a quick connectivity check.
Check the connection between the instances
Before we move into the actual File Service server implementation, let’s check the connections between the instances. We need to make sure everything is set up correctly.
Run the following on SERVER1:
ubuntu@ip-172-31-26-202:~$ nc -l -p 5002
Then run the following on the CLIENT:
ubuntu@ip-172-31-24-111:~$ echo "hello from CLIENT to SERVER1" | nc 172.31.16.124 5002
You should be able to see the message from the client displayed on SERVER1:
ubuntu@ip-172-31-16-124:~$ nc -l -p 5002
hello from CLIENT to SERVER1
This confirms that the connection between the CLIENT-Node and SERVER1 is working correctly. We could also have used port 5001, since both ports 5001 and 5002 are open for TCP connections.
You can repeat the same steps to test the connection between SERVER1 and SERVER2. The process is identical, so it is not shown here.
Create File Structure on each of the File Servers
We need a file structure as well as a file on the servers for this exercise. Log in to SERVER1 and run the following commands:
mkdir ~/file_storage
echo "This is file1 from SERVER1" > ~/file_storage/file1.txt
Repeat the same steps on SERVER2, but with slightly different content:
mkdir ~/file_storage
echo "This is file1 from SERVER2" > ~/file_storage/file1.txt
Notice that we are creating the same directory and file structure on both servers. However, the file contents are intentionally different. This difference is important for achieving the objective of this exercise.
Create the SERVER scripts
Now it is time to write the server scripts. These scripts will handle the client requests and serve them according to the requirements we defined at the beginning. This can be implemented in many ways using different programming languages or scripting. Writing the full application is not the primary objective of this exercise, so I will not go into detail here. For convenience, I have uploaded Python scripts in my GitHub repository.
File Server Implementation in Python
There are three files in the repository:
- client.py – runs on the CLIENT-Node and sends file requests to Server 1.
- server1.py – runs on SERVER1, receives client requests, communicates with SERVER2, compares files, and sends the result back to the client.
- server2.py – runs on SERVER2, listens for file requests from SERVER1 and responds with the requested file if available.
Copy the file client.py to the CLIENT-Node, server1.py to SERVER1, and server2.py to SERVER2. Once the files are copied, change the file permissions of each script using the following command:
Server 1:
chmod +x server1.py
Server 2:
chmod +x server2.py
Before you can start your file servers, you need to make one more change: modify the private IPs in server1.py. Open the server1.py file on SERVER1 and look for the string SERVER2_IP. Replace it with the private IP of your SERVER2 instance. In my case it is 172.31.26.202, so the line in the script looks like this:
SERVER2_IP = "172.31.26.202" # <-- PUT SERVER2 PRIVATE IP HERE
You also need to modify the private IP of SERVER1 in the client script, client.py. Open the client.py file on the CLIENT-Node instance and look for the string SERVER1_IP. Replace it with the private IP of your SERVER1 so the script can communicate correctly. In my case, the private IP of SERVER1 is 18.171.162.167, so the line in the script looks like this:
SERVER1_IP = "18.171.162.167" # <-- PUT SERVER1 PRIVATE IP HERE
Run the File Servers
Now it is finally time to run the file servers on each of the server instances. Then, test from the client to check whether everything is working. Start with SERVER2 first. Run the following:
ubuntu@ip-172-31-26-202:~$ ./server2.py
[SERVER2] Listening on 0.0.0.0:5002
Next, start SERVER1:
ubuntu@ip-172-31-16-124:~$ ./server1.py
[SERVER1] Listening on 0.0.0.0:5001
Finally, on the CLIENT-Node, run the client script:
ubuntu@ip-172-31-24-111:~$ ./client.py
You should see the client receiving a response from SERVER1 like the following:
ubuntu@ip-172-31-24-111:~$ ./client.py
[CLIENT] Received BOTH copies:

--- SERVER1 version ---
 This is file1 from SERVER1


--- SERVER2 version ---
 This is file1 from SERVER2
Now check the SERVER1 console output:
ubuntu@ip-172-31-16-124:~$ ./server1.py
[SERVER1] Listening on 0.0.0.0:5001
[SERVER1] CLIENT ('18.130.101.24', 46616) requested: file1.txt
[SERVER1] Versions differ; sent BOTH
And check the SERVER2 console output:
ubuntu@ip-172-31-26-202:~$ ./server2.py
[SERVER2] Listening on 0.0.0.0:5002
[SERVER2] Sent file1.txt (27 bytes) to ('172.31.16.124', 52124)
Analyzing the Output
The client (internal client EC2 instance) requests a file from SERVER1 using a hard-coded private IP address. SERVER1 already has the file file1.txt, but it still requests the same file from SERVER2.
[SERVER1] Listening on 0.0.0.0:5001
[SERVER1] CLIENT ('18.130.101.24', 46616) requested: file1.txt
SERVER2 receives the request from SERVER1 and responds with the file it has:
[SERVER2] Listening on 0.0.0.0:5002
[SERVER2] Sent file1.txt (27 bytes) to ('172.31.16.124', 52124)
The file sent by SERVER2 is received by SERVER1. SERVER1 compares its own copy with the one from SERVER2 and finds that they do not match. As a result, SERVER1 decides to send both versions back to the client. That is why the client shows that it received two files:
[CLIENT] Received BOTH copies:

--- SERVER1 version ---
 This is file1 from SERVER1


--- SERVER2 version ---
 This is file1 from SERVER2
Initially, testing the File Server involves using a client. The client runs inside the same security group and VPC as the servers. However, we can also test it from outside the VPC (for example, from a laptop). To do this, we run the client.py script on our local machine but configure it to connect to SERVER1 using its public IP address.
Because the IPs in client.py are currently hard-coded, we need to modify the script. A convenient approach is to copy client.py to a new file called client_public.py and edit it there.
For example, the public IP of SERVER1 in my case is 18.171.162.167. In the new script, the line looks like this:
SERVER1_IP = "18.171.162.167" # <-- PUT SERVER1 PUBLIC IP HERE
When running the modified script, the output is the same as when the client was running inside the EC2 environment. This confirms that the File Server works both internally within the VPC and externally via the public IP.
Test Case Identical Files on Both Servers
Now let’s test the case where both servers have the same version (content) of the file file1.txt. To do this, open the file ~/file_storage/file1.txt on SERVER2 and change its content as shown below:
This is file1 from SERVER1
Note that earlier the content on SERVER2 was:
This is file1 from SERVER2
After making this change, if we run the client (either from an EC2 instance or from the local laptop), we will see the following output:
vbhadra@vbhadra-DQ77MK:~$ ./client_public.py
[CLIENT] Received ONE copy:
This is file1 from SERVER1
This shows that when both SERVER1 and SERVER2 have identical files, only one copy is returned to the client.
Test Case Passing File Path from the Client
Now let’s test another case where the client specifies the path of the target file to SERVER1. To do this, we need to customize the folder structure on both SERVER1 and SERVER2. Follow these steps:
On SERVER2
Create a new directory under ~/file_storage and add a file:
ubuntu@ip-172-31-26-202:~$ mkdir -p ~/file_storage/docs
ubuntu@ip-172-31-26-202:~$ echo "server2-version" > ~/file_storage/docs/report.txt
Run the server2.py script again:
ubuntu@ip-172-31-26-202:~$ ./server2.py
[SERVER2] Listening on 0.0.0.0:5002
On SERVER1
Create the same directory and file with different content:
ubuntu@ip-172-31-16-124:~$ mkdir -p ~/file_storage/docs
ubuntu@ip-172-31-16-124:~$ echo "server1-version" > ~/file_storage/docs/report.txt
Run the server1.py script again:
ubuntu@ip-172-31-16-124:~$ ./server1.py
[SERVER1] Listening on 0.0.0.0:5001
On the Client
Request the file path explicitly:equest as the following:
ubuntu@ip-172-31-24-111:~$ ./client.py docs/report.txt
You should see the following output on the Client:
[CLIENT] Received BOTH copies:

--- SERVER1 version ---
 server1-version


--- SERVER2 version ---
 server2-version
On SERVER1 you will see:
[SERVER1] CLIENT ('172.31.24.111', 55258) requested: docs/report.txt
[SERVER1] Versions differ; sent BOTH
On SERVER2 you will see:
[SERVER2] Sent docs/report.txt (16 bytes) to ('172.31.16.124', 58262)
Wrapping Up the Test Cases
With these three test cases, we’ve walked through the full cycle of our distributed file service. In the first case, where the files on SERVER1 and SERVER2 were different, the client received both copies. This confirmed that our setup could detect mismatches and return multiple versions. In the second case, both servers held identical files. The client received only a single copy. This showed that unnecessary duplication is avoided. Finally, by allowing the client to specify a file path, we tested the flexibility of the system. We saw that it correctly retrieved different versions of the same file from each server.
These scenarios show how a simple distributed service can handle consistency. They demonstrate the detection of differences and the response to client requests in a controlled way. It’s not production-grade yet. However, it clearly shows the principles of coordination and communication across multiple servers in a distributed system.


Leave a Reply