As we continue our exploration of data engineering and machine learning, it’s essential to build upon the strong foundation laid in our previous blogs. We started by building an ETL pipeline for retail demand data, where we outlined the early stages of transforming raw data into valuable insights. Following that, we advanced to enhancing our ETL pipeline with AWS Glue, utilizing PySpark to delve deeper into optimizing our processes for greater efficiency.
Next, we explored critical aspects of data analysis with mastering EDA for demand forecasting on AWS. We then focused on the art of feature engineering for machine learning, learning how to extract meaningful insights from our data. This was followed by a discussion on training and evaluating machine learning models with AWS Glue. Our journey through the world of DataOps culminated in orchestrating AWS Glue workflows, setting the stage for our next significant exploration.
In this blog, we are excited to take a forward step by introducing Amazon EventBridge. This powerful service automates the execution of the workflows we’ve previously created, streamlining our processes and enhancing operational efficiency. By effectively integrating EventBridge into our existing architecture, we can make our demand forecasting efforts more responsive and agile. Let’s dive in and explore how EventBridge can elevate our data pipeline to new heights!
Automating AWS Glue Workflows with EventBridge
As we venture deeper into the integration of data engineering and machine learning, it becomes crucial to explore additional ways to optimize our workflows. Our latest objective is to automate the end-to-end AWS Glue Workflow (scdf-data-pipeline-workflow), ensuring it runs seamlessly every 2 minutes. This aligns perfectly with our DataOps scheduling requirements, facilitating continuous and unattended execution.
To achieve this, we’ll set up a time-based EventBridge rule using the simple expression rate(2 minutes). This setting will trigger our Glue Workflow at the designated interval. Additionally, we will create a target execution role that empowers EventBridge with the necessary permissions to initiate the workflow through glue:StartWorkflowRun.
To ensure smooth operations, we will also establish verification artifacts, which can consist of screenshots or logs that demonstrate that the scheduling is active and confirm that the runs occur as expected. By automating our workflow in this manner, we not only enhance operational efficiency but also pave the way for more responsive demand forecasting efforts, leading to more agile processes. Now, let’s dive into the specifics!
Create the EventBridge Rule
- Open Amazon EventBridge → Rules → Create rule.
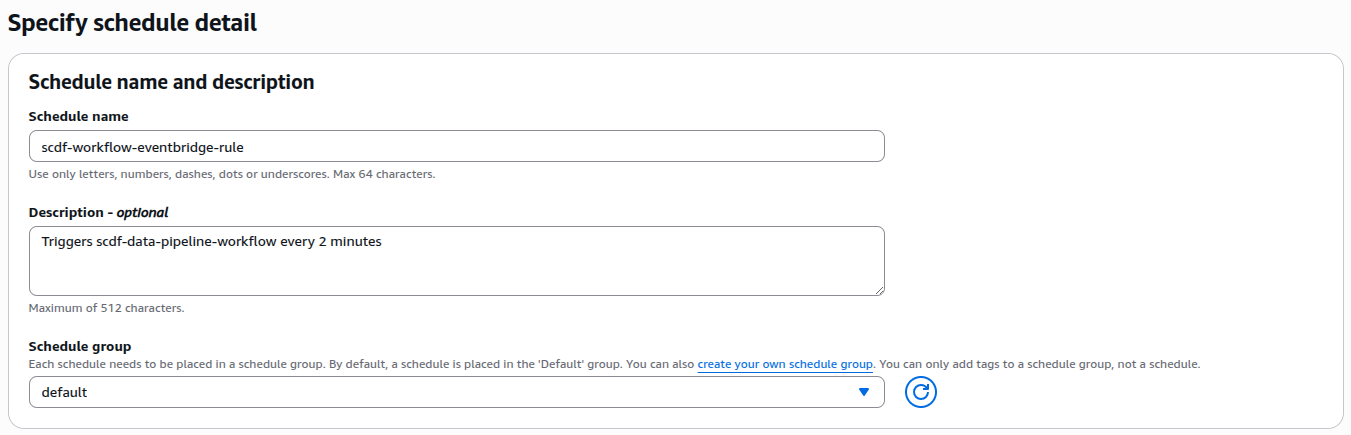
- Name:
scdf-workflow-every-2-mins - Description:
Triggers scdf-data-pipeline-workflow every 2 minutes - Event bus:
default - Rule type:
Schedule

When you click on Continue in the EventBridge Scheduler, the next page will display a few options to configure, as shown in the picture:
In the displayed settings for creating a new EventBridge rule, fill in the required fields:
- Name: Enter the name of the rule, which should be
scdf-workflow-every-2-mins. - Description: Provide a brief explanation of the rule’s purpose, such as
Triggers scdf-data-pipeline-workflow every 2 minutes. - Event bus: Select
defaultfor the event bus option. - Rule type: Set the rule type to
Schedule.
Next, we need to configure the schedule pattern.

EventBridge Rule Configuration
In this step, we configure the EventBridge Scheduler to automatically trigger the Glue workflow at fixed intervals. This setup defines a recurring schedule using a rate-based expression, ensuring that the data pipeline runs continuously without manual intervention. The time zone is set to (UTC+01:00) Europe/London, with the scheduling interval precisely maintained to ensure regular execution.
Configuration details:
- Occurrence: Recurring schedule
- Time zone: (UTC+01:00) Europe/London
- Schedule type: Rate-based schedule
- Rate expression:
rate(2 minutes) - Flexible time window: Off
With this configuration in place, the scdf-data-pipeline-workflow will be automatically triggered every two minutes, thus providing continuous DataOps automation as required.
Select Target for Scheduled Execution
Once you click Next, it will take you to the target page:
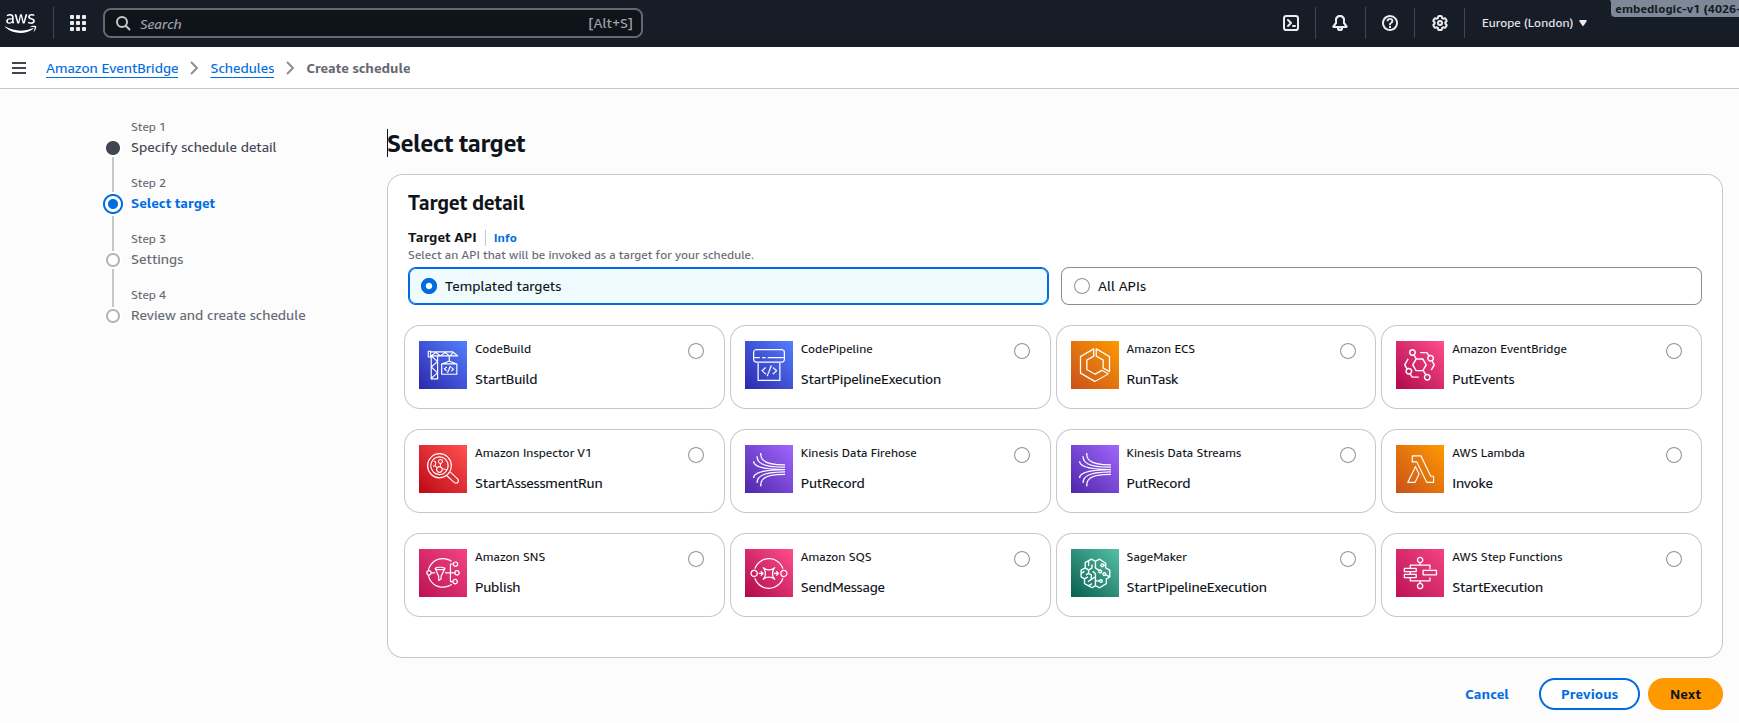
In this step, the EventBridge Scheduler target is configured to trigger the Glue workflow on each scheduled run. The screenshot shows the “Select target” screen, where only Templated targets are visible by default. Since AWS Glue is not listed in that view, we’ll switch to All APIs to manually select the Glue service.
Steps to configure:
In the Target detail section, change from Templated targets to All APIs.

In the search bar, type Glue.

Next, type in StartWorkflowRun in the AWS Glue search box as shown below:

Select StartWorkflowRun, and a JSON editor will appear.
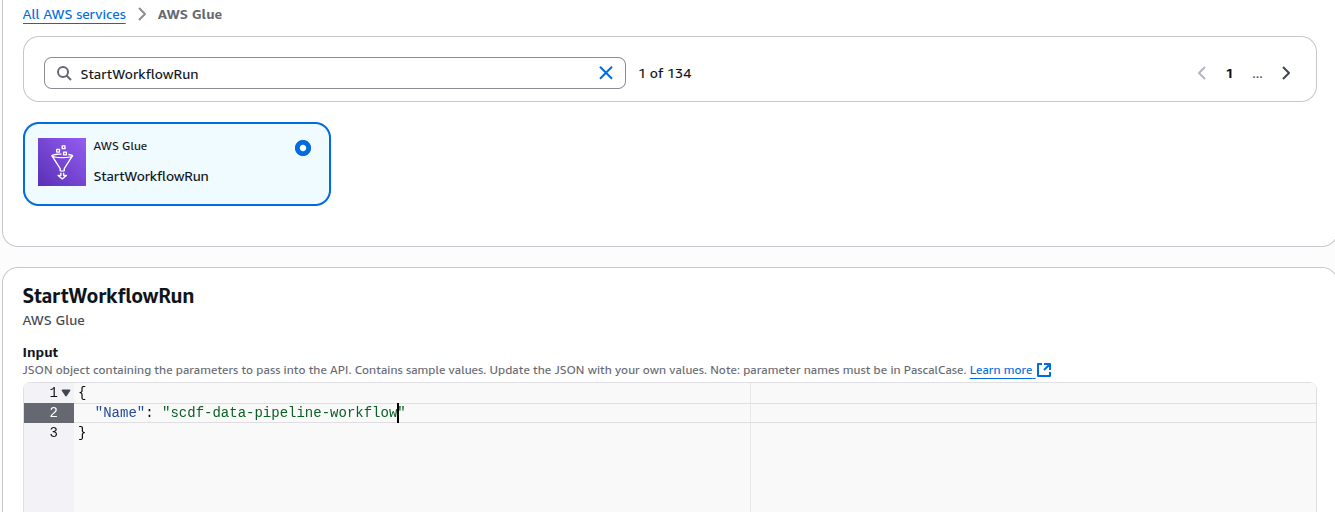
In the JSON editor, change the name to the following:
{
  "Name": "scdf-data-pipeline-workflow"
}
This corresponds to the name of our previously created workflow. Now click Next to proceed to the Settings page.
Configure Schedule Settings and Permissions
At this stage, we will define how the EventBridge Scheduler behaves after being created, focusing on its retry logic, encryption, and permission handling. These settings ensure that the schedule runs continuously, securely, and resiliently against transient failures. After selecting the target (AWS Glue → StartWorkflowRun), you’ll arrive at the Settings page. Configure the key parameters as follows:
- Schedule state: Set to Enable so the schedule starts running immediately.
- Action after schedule completion: Leave blank (default behavior).
- Retry policy: Disable Retry to prevent repeated invocations and control costs.
- Dead-letter queue (DLQ): Set to None — no SQS queue is needed for failed events.

Encryption: Leave it set to default.
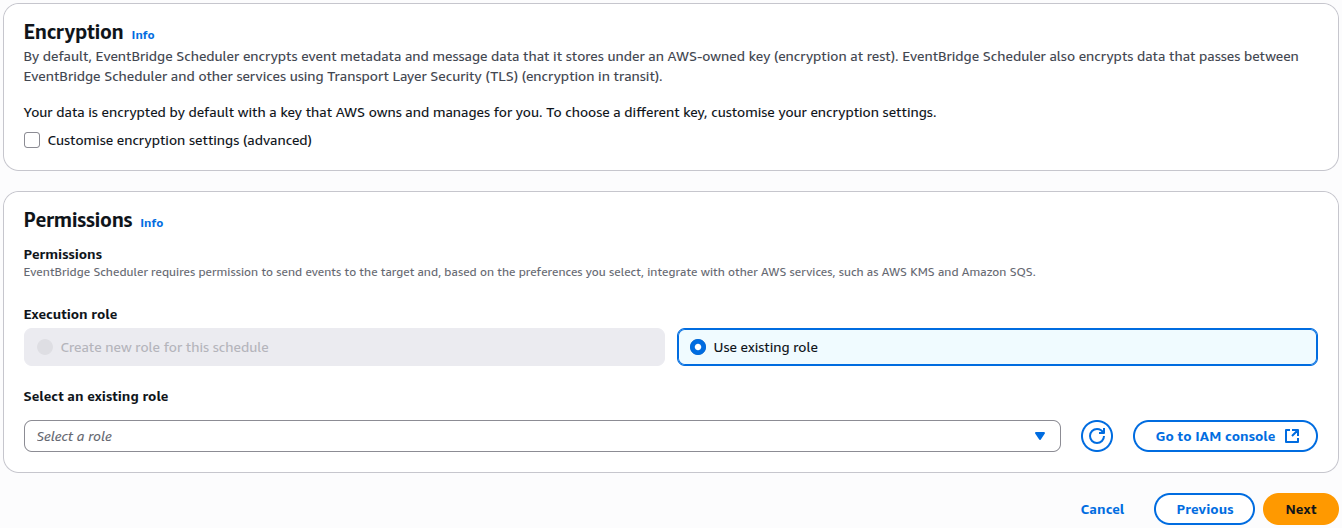
Permissions: Create Custom IAM Role
To allow the EventBridge Scheduler to securely trigger the AWS Glue workflow, it is essential to create a dedicated IAM role. This role must have appropriate trust and permission policies, ensuring that EventBridge can invoke the Glue service without granting excessive access.
Step 1: Define Trusted Entity
When creating the IAM role, follow these guidelines:
- Select Trusted Entity Type: Choose
AWS Service. - Use Case: Select
EventBridge Scheduler.
This setup will automatically configure the trust policy, allowing the service scheduler.amazonaws.com to assume the role.
The resulting trust relationship JSON should resemble the following:
{
  "Version": "2012-10-17",
  "Statement": [
    {
      "Effect": "Allow",
      "Principal": {
        "Service": "scheduler.amazonaws.com"
      },
      "Action": "sts:AssumeRole"
    }
  ]
}
By following these steps, you will ensure that your role is correctly set up, facilitating secure interactions between EventBridge and AWS Glue.
Step 2: Attach Permissions Policies
Attach the following managed AWS policies to the role:
- AWSGlueServiceRole – grants permission to start and manage AWS Glue workflows and jobs.
- CloudWatchLogsFullAccess – allows EventBridge-triggered runs to log their activity and status to Amazon CloudWatch for observability.
Together, these policies ensure that:
- The EventBridge scheduler can call
glue:StartWorkflowRunon the target workflow. - Logs from triggered Glue jobs can be written to CloudWatch for operational monitoring and troubleshooting.
Step 3: Name and Save the Role
- Role name:
EventBridge-GlueWorkflowRole - Description: Allows EventBridge Scheduler to trigger AWS Glue workflow executions.
Once created, this role can be selected under Permissions → Use existing role in the EventBridge Scheduler configuration screen.

EventBridge Rule Verification
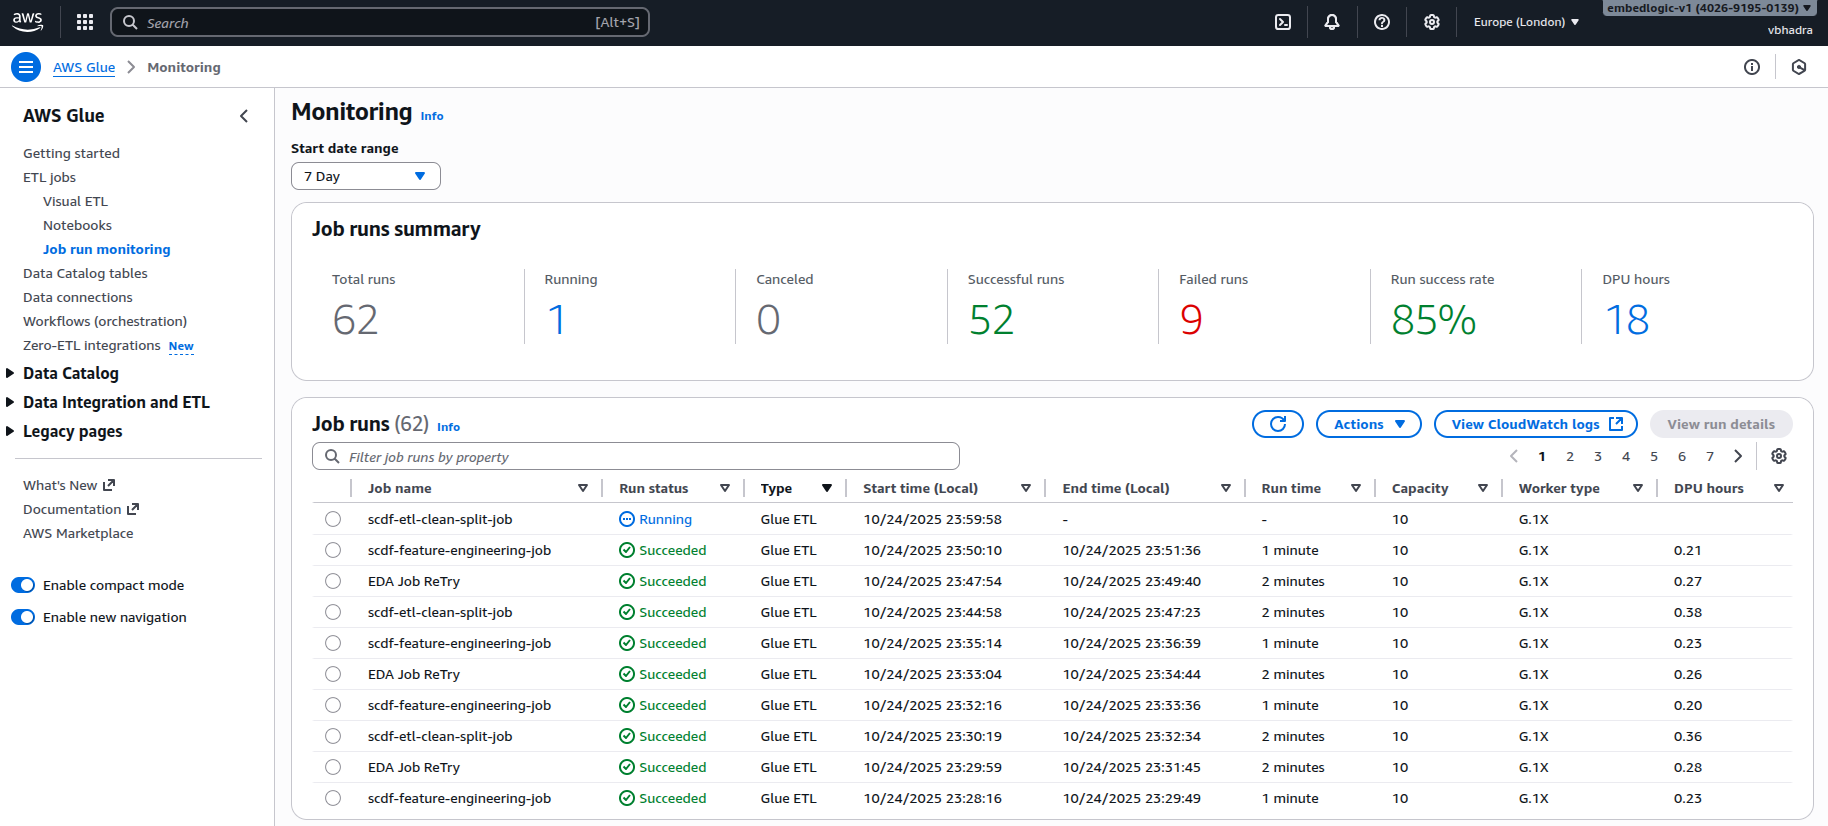
After setting everything up, it’s crucial to verify that the EventBridge rule is functioning as intended. To do this, open the AWS Glue Console, and navigate to Monitoring. Then, select Job run monitoring. This view provides a chronological list of all recent Glue job executions.
Each time the EventBridge scheduler triggers your workflow, a new job run entry should appear here. Under normal operation, you’ll see the jobs starting one after another — for example, scdf-etl-clean-split-job should finish before EDA Job Retry begins. This confirms that the workflow is being executed sequentially as designed.
If you notice multiple jobs from the same workflow running simultaneously, it indicates that a new workflow instance was triggered by EventBridge before the previous one finished. This typically means that the schedule interval is too short for your workflow’s execution time. To resolve this, consider increasing the interval — for instance, from 2 minutes to 15 minutes or longer — ensuring that each workflow run completes fully before the next trigger starts.
A sample monitoring screenshot demonstrating this behavior is shown below:
Additionally, you can verify the EventBridge-triggered workflow by checking the CloudWatch log traces. Navigate to the CloudWatch service, then open Log groups and select the group named /aws-glue/jobs/output. Inside this log group, click on Log streams — each stream corresponds to an individual Glue job run triggered by your workflow.
By opening the most recent log stream, you can trace the exact sequence of events: when the job started, whether it completed successfully, and how long it took to finish. Each EventBridge trigger should correspond to a new log stream entry. If you see multiple streams appearing within short intervals, it indicates overlapping workflow runs, confirming that your schedule interval may still be too short.

This screenshot displays the Amazon CloudWatch Log Streams page under the log group /aws-glue/jobs/output, listing individual log streams corresponding to recent AWS Glue job runs, each identified by a unique alphanumeric name. The “Last event time” column shows the last timestamp of log activity, indicating when each job generated output. This overview is essential for confirming when Glue jobs were triggered and assessing whether multiple runs occurred closely together, which may indicate overlapping EventBridge schedule executions.
Conclusion
Integrating Amazon EventBridge into our data engineering workflow has fundamentally transformed how we automate and manage AWS Glue processes. By implementing a time-based EventBridge rule, we’ve established a reliable mechanism for seamless and continuous execution of our demand forecasting pipeline. This integration not only streamlines operations but also enhances our responsiveness to evolving data conditions.
As we look ahead, the ability to automatically trigger workflows at defined intervals represents a significant advance in our DataOps maturity. It eliminates repetitive manual interventions, enabling teams to focus on higher-value tasks such as model optimization and data strategy refinement. With EventBridge orchestrating our workflows behind the scenes, we can operate with greater agility, precision, and scalability.
We encourage you to explore similar automation techniques within your own AWS ecosystem. This small investment in orchestration can yield substantial long-term efficiency and innovation gains.


Leave a Reply