Last weekend I tried to get my hand on GPU CUDA programming. I didn’t have access to a computer with a GPU. I thought AWS was the best possible way to go. I must say I wasn’t wrong.
However, I faced an issue I wasn’t anticipating at the beginning — a Service Quota restriction. I’ve already explained that problem in my previous blog. You can also find its resolution there: How to Configure AWS EC2 with NVIDIA GPU for CUDA Development.
Once the quota was approved, I could finally continue with the original goal. I aimed to run a real CUDA program on an NVIDIA GPU in AWS. I aimed to run a real CUDA program on an NVIDIA GPU in AWS.
Launching the Right EC2 Instance
To get started with GPU-based CUDA programming on AWS, set up a new EC2 instance. Ensure it has the right AMI (software environment). Confirm the hardware configuration includes GPU support. Follow these steps:
Instance Name
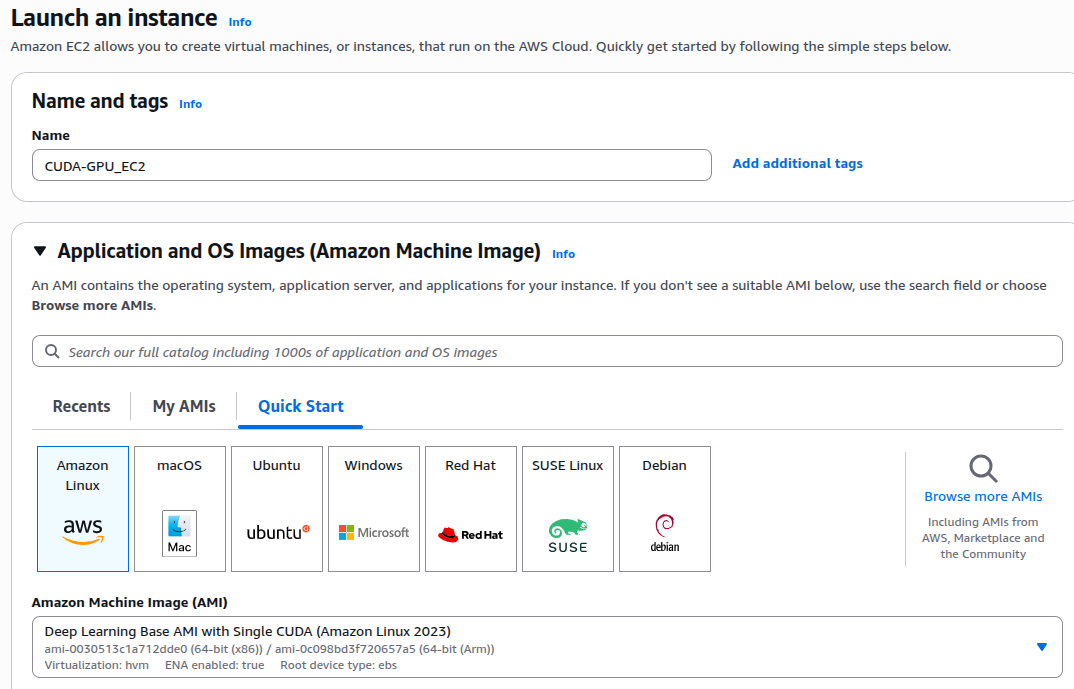
In the Name and Tags section, enter a clear name such as CUDA-GPU_EC2.
Select the Application and OS Image (AMI)
Under the Quick Start tab, choose Amazon Linux. It’s lightweight and stable. Additionally, it is well-supported for CUDA development.
From the available options, select:
Deep Learning Base AMI with Single CUDA (Amazon Linux 2023). This AMI is useful for the following reasons:
- It already comes with the CUDA Toolkit and NVIDIA drivers pre-installed and correctly configured.
- It’s clean and minimal — designed for compiler-based CUDA development rather than large AI frameworks.
- It saves setup time because you don’t need to install or configure drivers manually.
Architecture
Select 64-bit (x86).
Instance Type
Next, choose an instance type that provides GPU hardware. The most reliable and cost-effective option for testing CUDA programs is:
Instance Type: g4dn.xlarge
- GPU: 1 × NVIDIA T4
- vCPU: 4
- Memory: 16 GB

Key Pair
Choose an existing Key Pair or create a new key pair.

Network Settings
Leave the Network Settings as default.
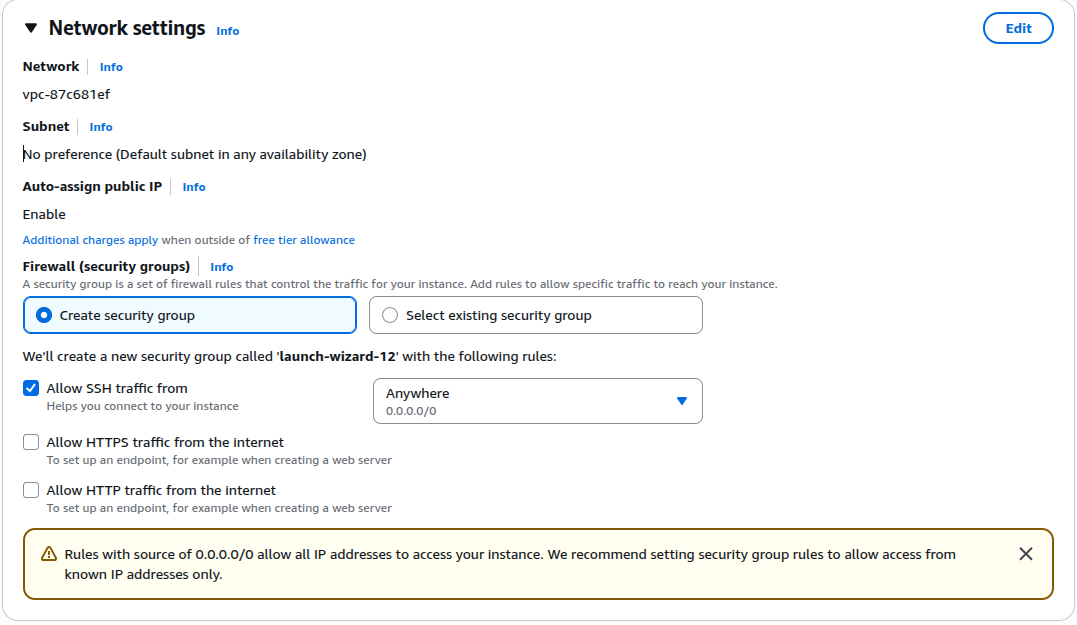
And leave rest of the settings to default and Launch the instance.
Log in to the EC2
From the EC2->Instances menu you should be able to see your just created instance is running after few minutes.

Click on your instance ID and go the the instance details page. Check everything as expected. And then note the public IP of the instance. We have to log in to the instance and start doing the CUDA programming for our GPU.
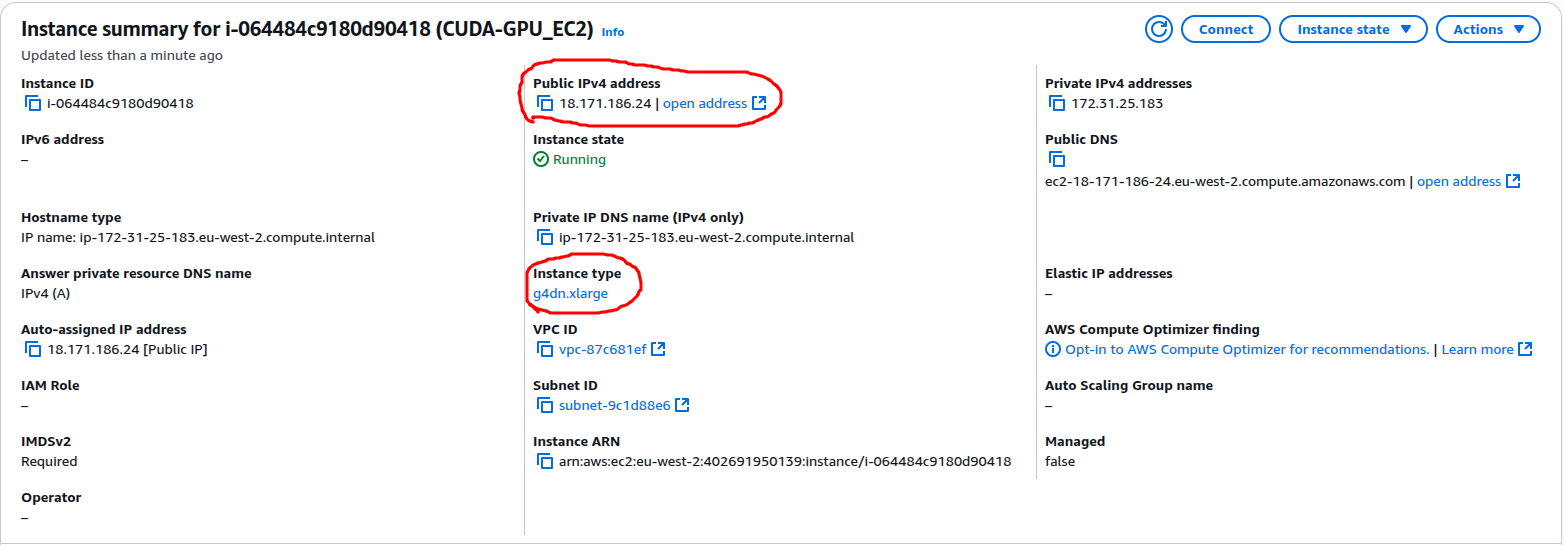
To log into the instance type in the following from a Linux console or any maybe Putty:
ssh -i ~/Downloads/CUDA-Assignment-Key-Pair.pem ec2-user@18.171.186.24
I have my Key Pair located at ~/Downloads/CUDA-Assignment-Key-Pair.pem, hence I have used it. You have to locate your key pair .pem file and use the appropriate PATH in the above command. Also, for this instance type the default user name is ec2-user. Once you issue the above command on a Linux console you should able to log in to the EC2 instance. In my case I see the below when login:
vbhadra@vbhadra-DQ77MK:~/CISS_ASSIGNMENT$ ssh -i ~/Downloads/CUDA-Assignment-Key-Pair.pem ec2-user@18.171.186.24
The authenticity of host '18.171.186.24 (18.171.186.24)' can't be established.
ED25519 key fingerprint is SHA256:uy8OHhyB+m/HFqmJ+wXjVXVPV/4k0PCxreWiRhYqWFQ.
This key is not known by any other names
Are you sure you want to continue connecting (yes/no/[fingerprint])? yes
Warning: Permanently added '18.171.186.24' (ED25519) to the list of known hosts.
=============================================================================
AMI Name: Deep Learning Base AMI with Single CUDA (Amazon Linux 2023)
Supported EC2 instances: G4dn, G5, G6, Gr6, G6e, P4d, P4de, P5, P5e, P5en, P6-B200
NVIDIA driver version: 580.95.05
CUDA versions available: cuda-12.8
Default CUDA version is 12.8

Scripts to setup SageMaker HyperPod are in /opt/aws/dlami/sagemaker_hyperpod

Release notes: https://docs.aws.amazon.com/dlami/latest/devguide/appendix-ami-release-notes.html
AWS Deep Learning AMI Homepage: https://aws.amazon.com/machine-learning/amis/
Developer Guide and Release Notes: https://docs.aws.amazon.com/dlami/latest/devguide/what-is-dlami.html
Support: https://forums.aws.amazon.com/forum.jspa?forumID=263
For a fully managed experience, check out Amazon SageMaker at https://aws.amazon.com/sagemaker
=============================================================================
   ,     #_
   ~\_  ####_        Amazon Linux 2023
  ~~  \_#####\
  ~~     \###|
  ~~       \#/ ___   https://aws.amazon.com/linux/amazon-linux-2023
   ~~       V~' '->
    ~~~         /
      ~~._.   _/
         _/ _/
       _/m/'
Check GPU status and driver information
Once you have logged into your EC2 instance you need to verify if if you are good to go. Check the GPU driver status using the following command on the console:
nvidia-smi
It should give a similar output as the following:

Verify CUDA Toolkit installation
You need to ensure that the CUDA Toolkit’s compiler, nvcc, is properly installed. Make sure it is accessible in your system path. Run this command:
nvcc –version
[ec2-user@ip-172-31-25-183 ~]$ nvcc –version
nvcc: NVIDIA (R) Cuda compiler driver
Copyright (c) 2005-2025 NVIDIA Corporation
Built on Fri_Feb_21_20:23:50_PST_2025
Cuda compilation tools, release 12.8, V12.8.93
Build cuda_12.8.r12.8/compiler.35583870_0
Check if the GPU is detected at the hardware level
To confirm that the GPU hardware itself is visible to the operating system, use the lspci command. It lists all connected devices, and you can filter for NVIDIA entries like this:
[ec2-user@ip-172-31-25-183 ~]$ lspci | grep -i nvidia
00:1e.0 3D controller: NVIDIA Corporation TU104GL [Tesla T4] (rev a1)
This confirms that the system has detected the NVIDIA Tesla T4 GPU.
At this point, you know that your hardware, driver, and CUDA runtime are all aligned. The environment is ready for compiling and running CUDA programs.
Connecting Your EC2 Instance to GitHub Using SSH
I usually keep all my code in Guthub and then close the code from the Github repository and use it. First, I need to add my RSA key of the EC2 instance to my Github. This will allow cloning. To generate the RSA key on the EC2 do the following:
[ec2-user@ip-172-31-25-183 ~]$ ssh-keygen -t rsa -b 4096 -C "vivek.bhadra@gmail.com"
Generating public/private rsa key pair.
Enter file in which to save the key (/home/ec2-user/.ssh/id_rsa):
Enter passphrase (empty for no passphrase):
Enter same passphrase again:
Your identification has been saved in /home/ec2-user/.ssh/id_rsa
Your public key has been saved in /home/ec2-user/.ssh/id_rsa.pub
The key fingerprint is:
SHA256:kp2a+RMkvQbz0i0WNVaGAPMnPxy4iXGs1VaPltd5ZdQ vivek.bhadra@gmail.com
The key's randomart image is:
+---[RSA 4096]----+
|      o... o+  .=|
|       + o=o + oE|
|      ..Bo=.+ o.o|
|      +O+X o .  .|
|      =BS++      |
|      .=O ..     |
|      ++ o       |
|       ..        |
|        ..       |
+----[SHA256]-----+
[ec2-user@ip-172-31-25-183 ~]$ cat ~/.ssh/id_rsa.pub
The last command on the above listing will print the RSA public key. Copy it and add it to the Github.
Add the key to your GitHub account
- Go to GitHub → Settings → SSH and GPG keys
- Click New SSH key
- Give it a name, e.g.,
AWS EC2 CUDA - Paste the public key you just copied
- Click Add SSH key
Clone the CUDA repository
Clone the CUDA code from the repository: GPU_CUDA_PROGRAMMING
[ec2-user@ip-172-31-25-183 ~]$ git clone git@github.com:vivekbhadra/GPU_CUDA_PROGRAMMING.git
Once you have cloned the above repository you should have a directory called GPU_CUDA_PROGRAMMING. Go inside the directory and you should see the below source code file: vector_add_compare.cu.
Compiling and Running Your CUDA Program
Your CUDA source code is now on the EC2 instance. The next step is to compile it using NVIDIA’s CUDA compiler (nvcc). After that, run it on the GPU. The Deep Learning Base AMI with Single CUDA image already comes with nvcc pre-installed. You can compile directly without any extra setup. To compile the CUDA source file, use:
[ec2-user@ip-172-31-25-183 GPU_CUDA_PROGRAMMING]$ nvcc vector_add_compare.cu -o vector_add_compare
nvcc warning : Support for offline compilation for architectures prior to ‘_75’ will be removed in a future release (Use -Wno-deprecated-gpu-targets to suppress warning).
[ec2-user@ip-172-31-25-183 GPU_CUDA_PROGRAMMING]$
When you compile your CUDA program using nvcc, the NVIDIA CUDA compiler translates the CPU (host) and GPU (device) code. It creates an executable that can run directly on the GPU. To supress the warning above you may like to use the following command:
nvcc -Wno-deprecated-gpu-targets vector_add_compare.cu -o vector_add_compare
Running the CUDA Program
After compiling your CUDA program successfully, you can now run it directly on the GPU.
This is where you’ll see the difference between CPU and GPU execution times in action.
Run the program using:
[ec2-user@ip-172-31-25-183 GPU_CUDA_PROGRAMMING]$ ./vector_add_compare
Vector size: 16777216 elements (64 MB per array)
CPU Execution Time: 124 ms
GPU Execution Time: 0.820064 ms
Result Verification: PASS
Sample value check: C[0] = 3
Speedup = 151.208x faster on GPU
——————————————-
Understanding the Output
Now, lets understand few things about this program and the output we have seen:
Vector size:
Each input array (A and B) contains over 16 million floating-point numbers. That’s roughly 64 MB per array, so the total data processed (A, B, and C) is nearly 192 MB. It’s a large enough dataset to showcase GPU parallelism effectively.
CPU Execution Time:
The CPU version uses a simple loop to perform all additions sequentially. It took about 124 milliseconds to process all 16 million elements — reasonable for a single-threaded CPU operation.
GPU Execution Time:
The GPU version completed the same task in just 0.82 milliseconds. That’s because the work was divided across thousands of CUDA cores, allowing many additions to occur simultaneously.
This time only measures the actual kernel execution on the GPU. It does not measure memory transfer. This is why it’s so fast.
Result Verification:
The program checks that the GPU results exactly match those from the CPU.
Seeing “PASS” confirms numerical accuracy and correct kernel behavior.
Speedup:
The GPU performed the computation about 151 times faster than the CPU.
This value is calculated using the simple ratio of CPU time to GPU time:
Speedup = CPU Execution Time / GPU Execution Time
Speedup = 124 ms / 0.82 ms ≈ 151.2x
This means that, for this workload, the GPU completed the same vector addition roughly 151 times faster than the CPU.
So that’s it. You’ve just executed your first CUDA program on a real NVIDIA GPU. You achieved this without owning any GPU hardware at all. Thanks to AWS, you can now explore GPU computing on demand, right from the cloud.


Leave a Reply